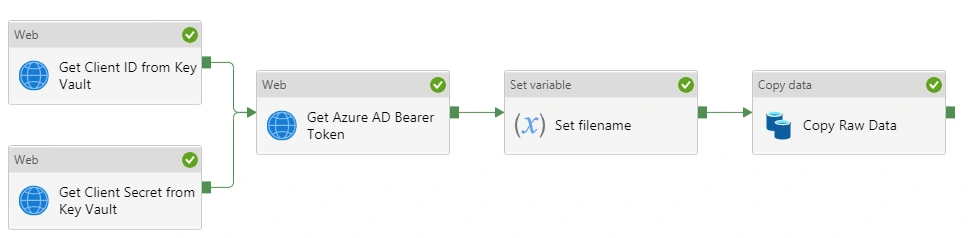
Part 2: Reporting on Log Analytics data | Building the query and extracting data using Azure Data Factory
Part 2 of Reporting on Log Analytics data series.
Azure Data Factory
Azure Data Lake
Data Engineering
In this next post in this series, the data extracted using Azure Data Factory will be transformed into a readable format using Azure Databricks and adding this logic into the Azure Data Factory pipeline
If you missed it, here is a link to Part 2
To complete this next portion of the process, an Azure Databricks workspace will have to be deployed within the subscription that is being used.
##Run if Az PowerShell module is not already installed
 Install-Module Az -AllowClobber

##Run if Az PowerShell module is already installed but update check is required
Update-Module Az
Import-Module Az
Connect-AzAccount
##Set our variables
$vaultName = '<Enter previously created '
$databricksWorkspaceName = '<Enter your workspace name>'
$servicePrincipalName = $databricksWorkspaceName, '-ServicePrincipal'
$servicePrincipalScope = '/subscriptions/<subscriptionid>/resourceGroups/<resourcegroupname>/<providers/Microsoft.Storage/storageAccounts/<storageaccountname>'
##Create Azure AD Service Principal
$createServicePrincipal = New-AzADServicePrincipal -DisplayName $servicePrincipalName -Role 'Storage Blob Data Contributor' -Scope $servicePrincipalScope
##Save service principal client id in KeyVault
Set-AzKeyVaultSecret -VaultName $vaultName -Name 'databricks-service-principal-client-id' -SecretValue (ConvertTo-SecureString -AsPlainText ($createServicePrincipal.ApplicationId))

##Save service principal secret in KeyVault
Set-AzKeyVaultSecret -VaultName $vaultName -Name 'databricks-service-principal-secret' -SecretValue $createServicePrincipal.Secret
NB - There is a breaking change introduced in Spark 3.2 that breaks the code shown in step 6. Please use Databricks 9.1 LTS Runtime
(All code shown is located in my GitHub repository - here)
In your workspace, expand the Workspace menu in the left pane, then open the Shared folder. In the shared folder, click on the down arrow and select Create Notebook 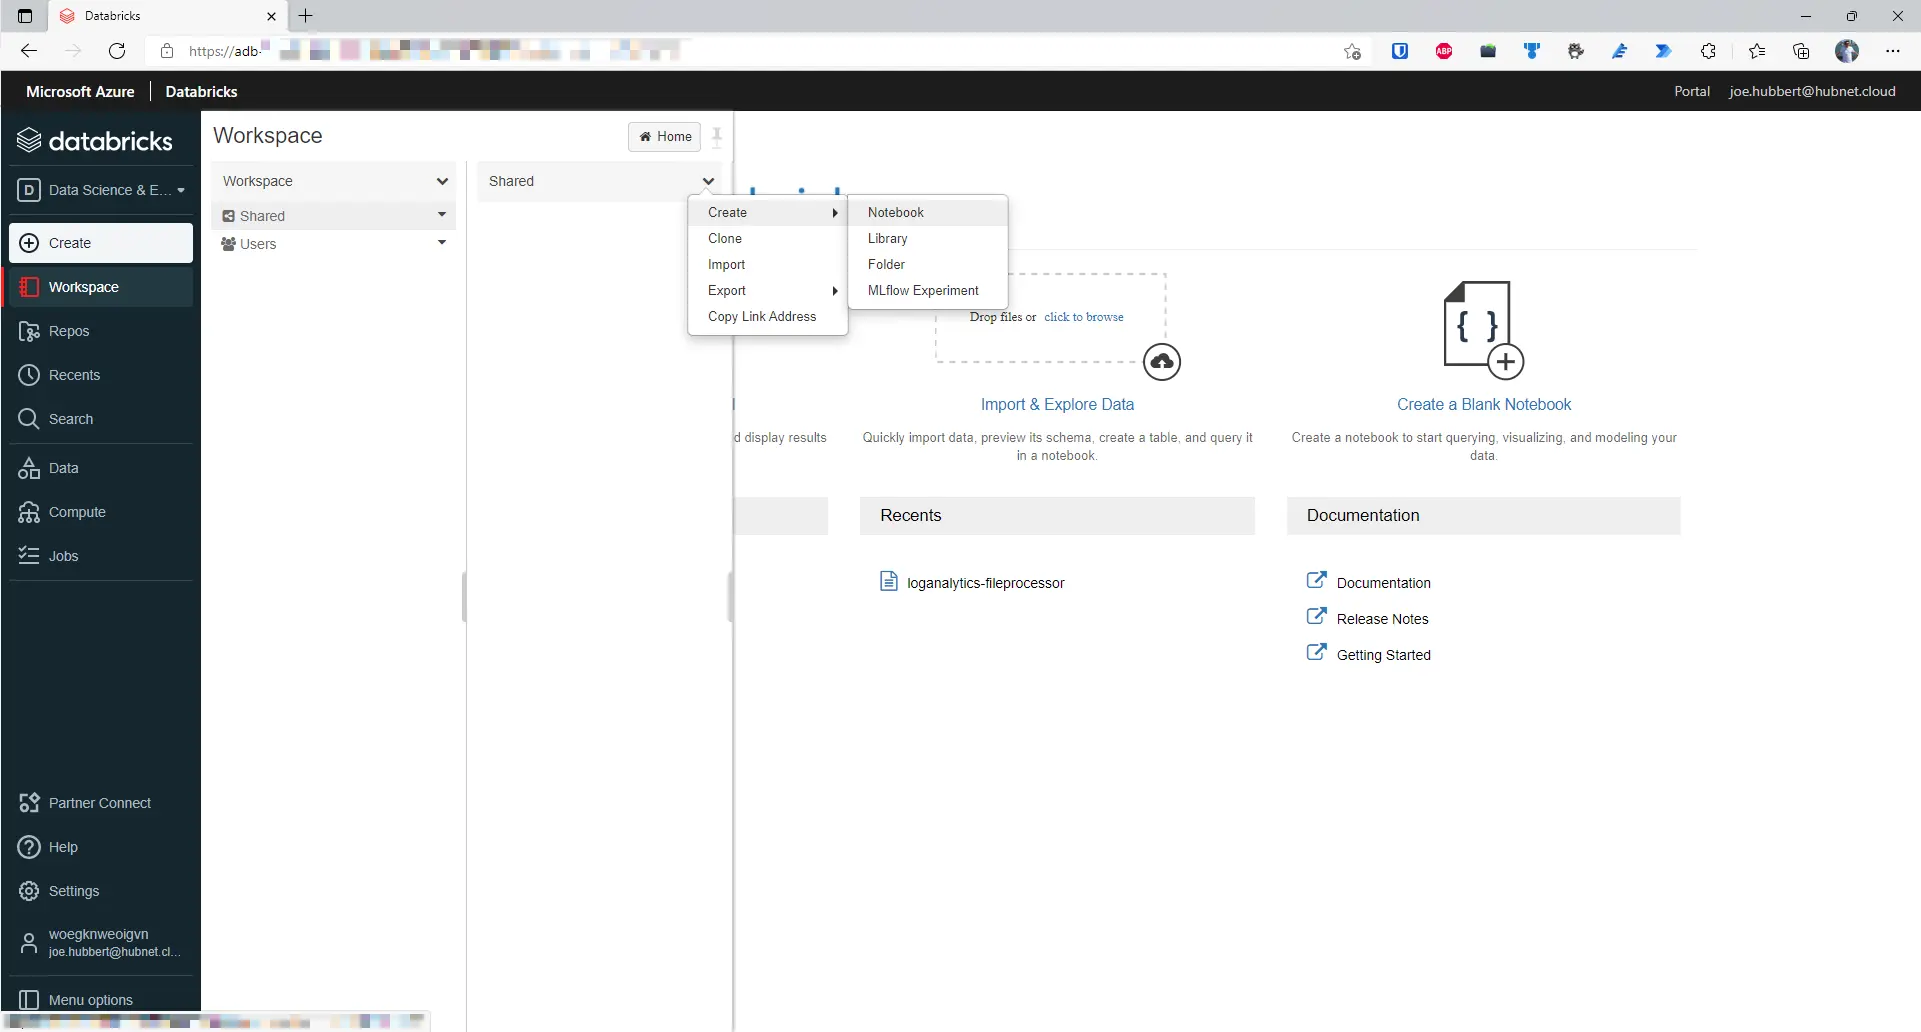
As shown below, choose a name for the workbook. I will be using loganalytics-fileprocessor. Scala will also be the language used in this notebook so select that in the Default Language dropdown and click Create 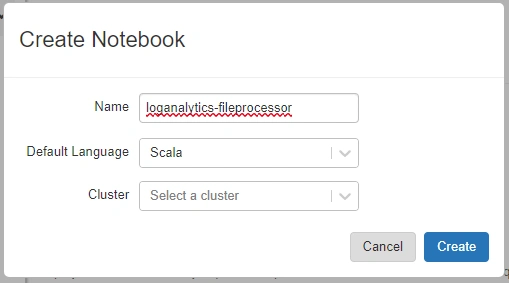
NB - Be careful with copying and pasting code. There may be code execution errors where extra/incompatible spacing gets pasted into your Databricks notebook. Now the notebook has been created, the first block of code can be written to make this notebook dynamic. This will enable two things. Firstly, the pipelineRunId from Data Factory can be passed in as a parameter as well as the folder path of where the file has been written to. Give this codeblock the title, ‘Parameters’ using the dropdown menu on the right hand side of the code block
//Define folderPath
dbutils.widgets.text("rawFilename", "")
val paramRawFile = dbutils.widgets.get("rawFilename")

//Define pipelineRunId
dbutils.widgets.text("pipelineRunId", "")
val paramPipelineRunId = dbutils.widgets.get("pipelineRunId")
Create a new code block called ‘Declare and set variables’. Next, we need to declare the variables we shall be using in the notebook. Notice how I used the abfss driver which has been optimized for Data Lake Gen 2 and big data workloads over the standard wasbs using for regular blob storage. In this scenario, the dataset isn’t that big but performance will be noticeable when the dataset is significantly larger so best to keep with the best practice
val dataLake = "abfss://<containername>@<datalakename>.dfs.core.windows.net"
val rawFolderPath = ("/raw-data/")
val rawFullPath = (dataLake + rawFolderPath + paramRawFile)
val outputFolderPath = "/output-data/"
val databricksServicePrincipalClientId = dbutils.secrets.get(scope = "databricks-secret-scope", key = "databricks-service-principal-client-id")
val databricksServicePrincipalClientSecret = dbutils.secrets.get(scope = "databricks-secret-scope", key = "databricks-service-principal-secret")
val azureADTenant = dbutils.secrets.get(scope = "databricks-secret-scope", key = "azure-ad-tenant-id")
val endpoint = "https://login.microsoftonline.com/" + azureADTenant + "/oauth2/token"
val dateTimeFormat = "yyyy_MM_dd_HH_mm"
Create a new code block called ‘Set storage context and read source data’. In order to access the data lake, we must set the storage context for the session when the notebook is executed
import org.apache.spark.sql

spark.conf.set("fs.azure.account.auth.type", "OAuth")
spark.conf.set("fs.azure.account.oauth.provider.type", "org.apache.hadoop.fs.azurebfs.oauth2.ClientCredsTokenProvider")
spark.conf.set("fs.azure.account.oauth2.client.id", databricksServicePrincipalClientId)
spark.conf.set("fs.azure.account.oauth2.client.secret", databricksServicePrincipalClientSecret)
spark.conf.set("fs.azure.account.oauth2.client.endpoint", endpoint)

val sourceDf = spark.read.option("multiline",true).json(rawFullPath)
Create a new code block called ‘Explode source data columns into tabular format’. Now we can get the data into a tabular form using an explode function. Replace the columns explicitly defined on line 9 which match up with your chosen Log Analytics function output schema
import org.apache.spark.sql.functions._

val explodedDf = sourceDf.select(explode($"tables").as("tables"))
.select($"tables.columns".as("column"), explode($"tables.rows").as("row"))
.selectExpr("inline(arrays_zip(column, row))")
.groupBy()
.pivot($"column.name")
.agg(collect_list($"row"))
.selectExpr("inline(arrays_zip(timeGenerated, userAction, appUrl, successFlag, httpResultCode, durationOfRequestMs, clientType, clientOS, clientCity, clientStateOrProvince, clientCountryOrRegion, clientBrowser, appRoleName, snapshotTimestamp))")

display(explodedDf)
Create a new code block called ‘Transform source data’. We need to add some datapoints to our data frame to help with partitioning efficiently so when our dataset grows as more pipeline executions occur; we minimize performance bottlenecks where possible. In this case, we also want to add the ADF pipeline run id to help with troubleshooting if there are data quality issues in the final destination.
import org.apache.spark.sql.SparkSession

val pipelineRunIdSparkSession = SparkSession
    .builder()
    .appName("Pipeline Run Id Appender")
    .getOrCreate()

// Register the transformed DataFrame as a SQL temporary view

explodedDf.createOrReplaceTempView("transformedDf")

val transformedDf = spark.sql("""
SELECT DISTINCT
timeGenerated,
userAction,
appUrl,
successFlag,
httpResultCode,
durationOfRequestMs,
clientType,
clientOS,
clientCity,
clientStateOrProvince,
clientCountryOrRegion,
clientBrowser,
appRoleName,
snapshotTimestamp,
'""" + paramPipelineRunId + """' AS pipelineRunId,
CAST(timeGenerated AS DATE) AS requestDate,
HOUR(timeGenerated) AS requestHour
FROM transformedDf""").toDF

display(transformedDf)
Create a new code block called ‘Write transformed data to delta lake’. To keep track of history in our fact data, we can make use of the Delta Lake functionality in Azure Databricks. First we need to ensure that a database named logAnalyticsdb exists. Otherwise, the first line of code in the next block will create it for us. Whilst it’s not mandatory to use explicitly named databases in Databricks, it does make life much easier once there are many tables being saved. This avoids the ‘default’ database becoming a cluttered mess. This is a similar approach to organising a Microsoft SQL Server database where you would want to categorize tables into different schemas e.g. raw, staging, final instead of having everything in the dbo schema.
import org.apache.spark.sql.SaveMode

display(spark.sql("CREATE DATABASE IF NOT EXISTS logAnalyticsdb"))

transformedDf.write
  .format("delta")
  .mode("append")
  .option("mergeSchema","true")
  .partitionBy("requestDate", "requestHour")
  .option("path", "/delta/logAnalytics/websiteLogs")
  .saveAsTable("logAnalyticsdb.websitelogs")

val transformedDfDelta = spark.read.format("delta")
  .load("/delta/logAnalytics/websiteLogs")

display(transformedDfDelta)
Create a new code block called ‘Remove stale data, optimize and vacuum delta table’. In order to control the size of the delta lake table, we must carry out the following steps. Firstly, delete any records older than 7 days. Then ‘optimize’ the table by performing a ZORDER function on the snapshotTimestamp column and condensing the data into as few parquet files as possible to improve query performance. Finally, we run a vacuum on it to ensure that only the required parquet files are kept. In this case, we want to keep 7 days worth of data. The syntax for the vacuum command expects the parameter expressed in hours. In our case, we are happy with the default setting of 7 days/168 hours so no parameter required in this case. Afterwards, we will show the delta history
import io.delta.tables._

display(spark.sql("""
DELETE
FROM logAnalyticsdb.websitelogs
WHERE requestDate < DATE_ADD(CURRENT_TIMESTAMP, -7)
"""))

display(spark.sql("""
OPTIMIZE logAnalyticsdb.websitelogs
ZORDER BY (snapshotTimestamp)
"""))

val deltaTable = DeltaTable.forPath(spark, "/delta/logAnalytics/websiteLogs")
deltaTable.vacuum()

display(spark.sql("DESCRIBE HISTORY logAnalyticsdb.websitelogs"))
Create a new code block called ‘Create data frame for output file’. Now select the required datapoints from the delta lake table we’ll need for the output
import org.apache.spark.sql.SparkSession

val outputFileSparkSession = SparkSession
.builder()
.appName("Output File Generator")
.getOrCreate()

val outputDf = spark.sql("""
SELECT DISTINCT
timeGenerated,
userAction,
appUrl,
successFlag,
httpResultCode,
durationOfRequestMs,
clientType,
clientOS,
clientCity,
clientStateOrProvince,
clientCountryOrRegion,
clientBrowser,
appRoleName,
requestDate,
requestHour,
pipelineRunId
FROM logAnalyticsdb.websitelogs
WHERE pipelineRunId = '""" + paramPipelineRunId + """'
"""
)
display(outputDf)
Create a new code block called ‘Create output file in data lake’. Let’s save this output to our data lake
import org.apache.spark.sql.functions._

val currentDateTimeLong = current_timestamp().expr.eval().toString.toLong
val currentDateTime = new java.sql.Timestamp(currentDateTimeLong/1000).toLocalDateTime.format(java.time.format.DateTimeFormatter.ofPattern(dateTimeFormat))
val outputSessionFolderPath = ("appLogs_" + currentDateTime)
val fullOutputPath = (dataLake + outputFolderPath + outputSessionFolderPath)

outputDf.write.parquet(fullOutputPath)
Create a new code block called ‘Display output parameters’. We need to add one more code block of which will be an output parameter we will send back to Azure Data Factory so it knows which file to process
dbutils.notebook.exit(outputFolderPath + outputSessionFolderPath)
To allow Azure Databricks to read secrets stored in an Azure Key vault, explicit permissions must be specified for Azure Databricks through the use of an ‘Access Policy’.
NB - Azure role-based access control is the usual method for assigning permissions in Azure but we want very specific permissions which might be too broadly defined in a key vault RBAC role
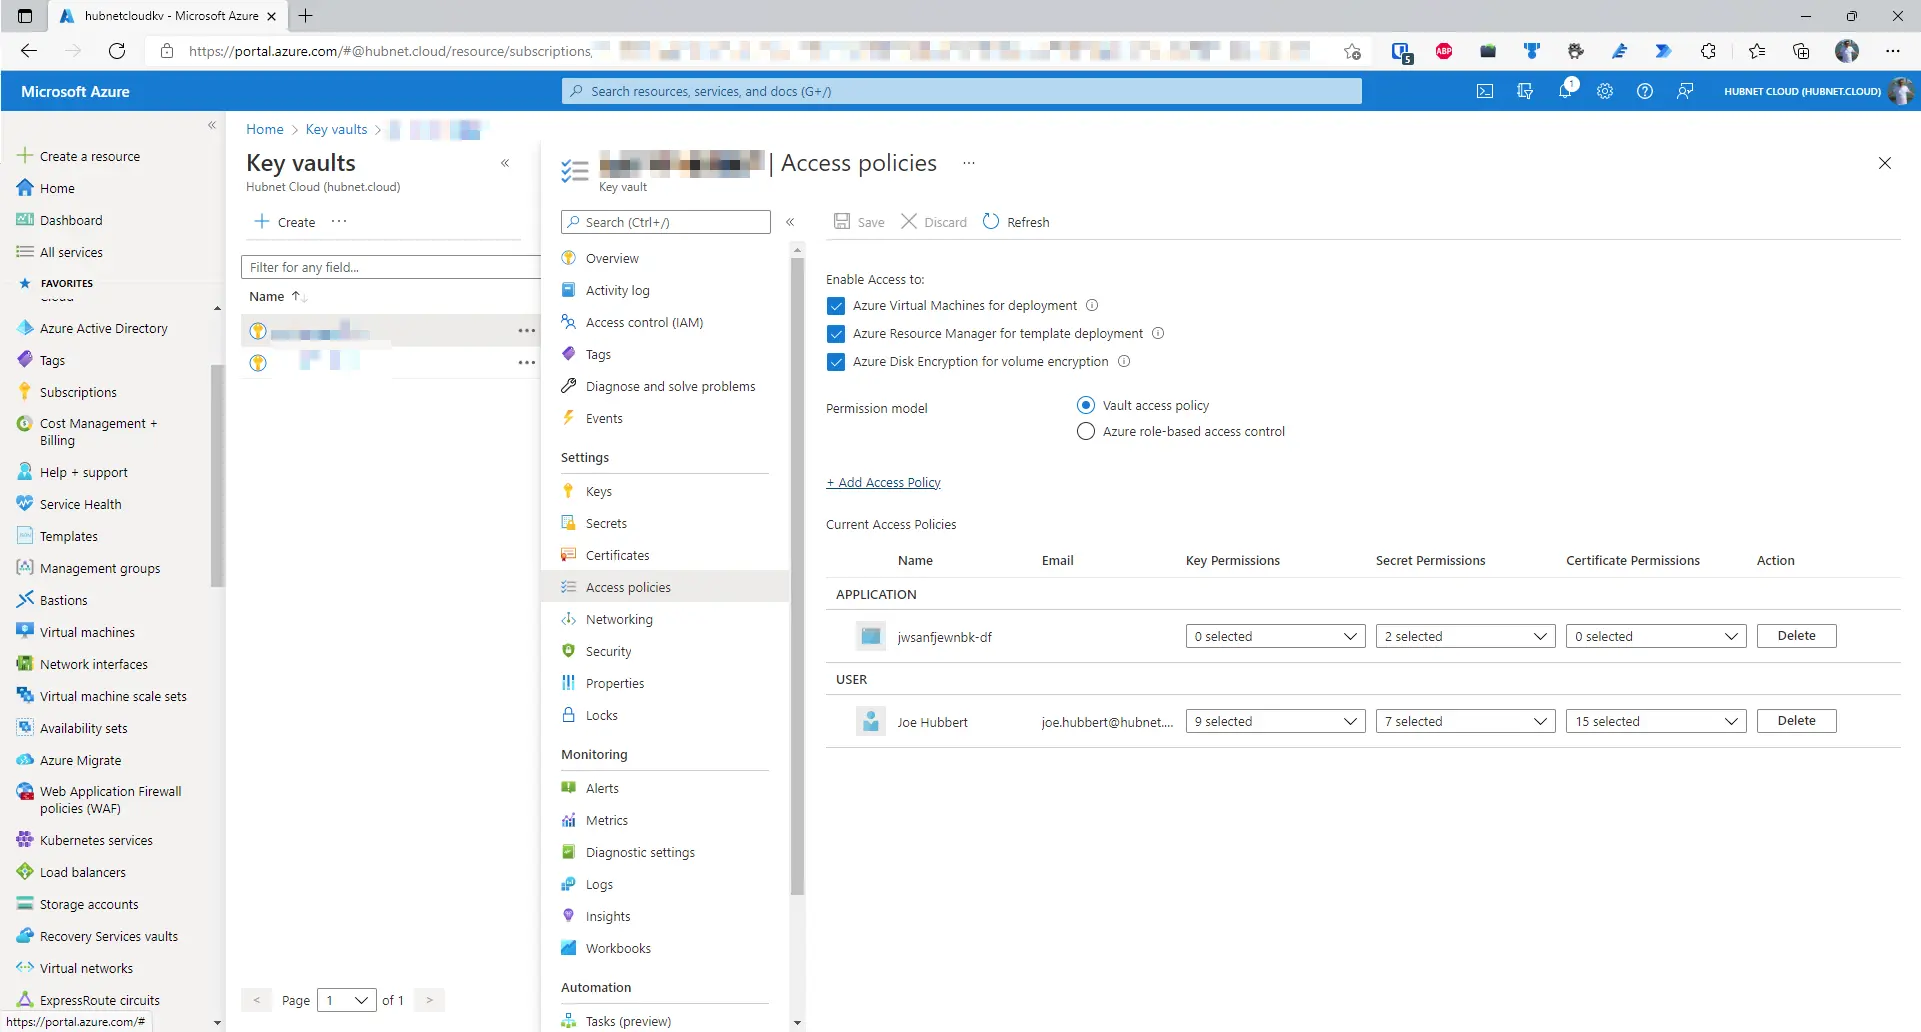
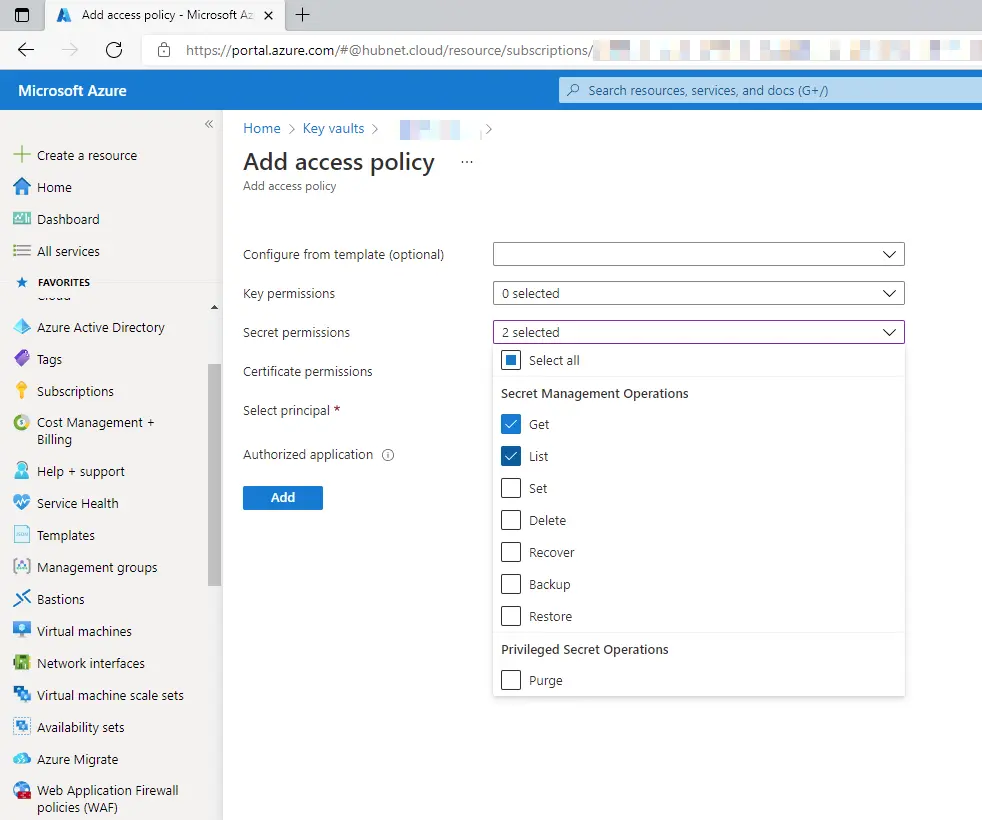
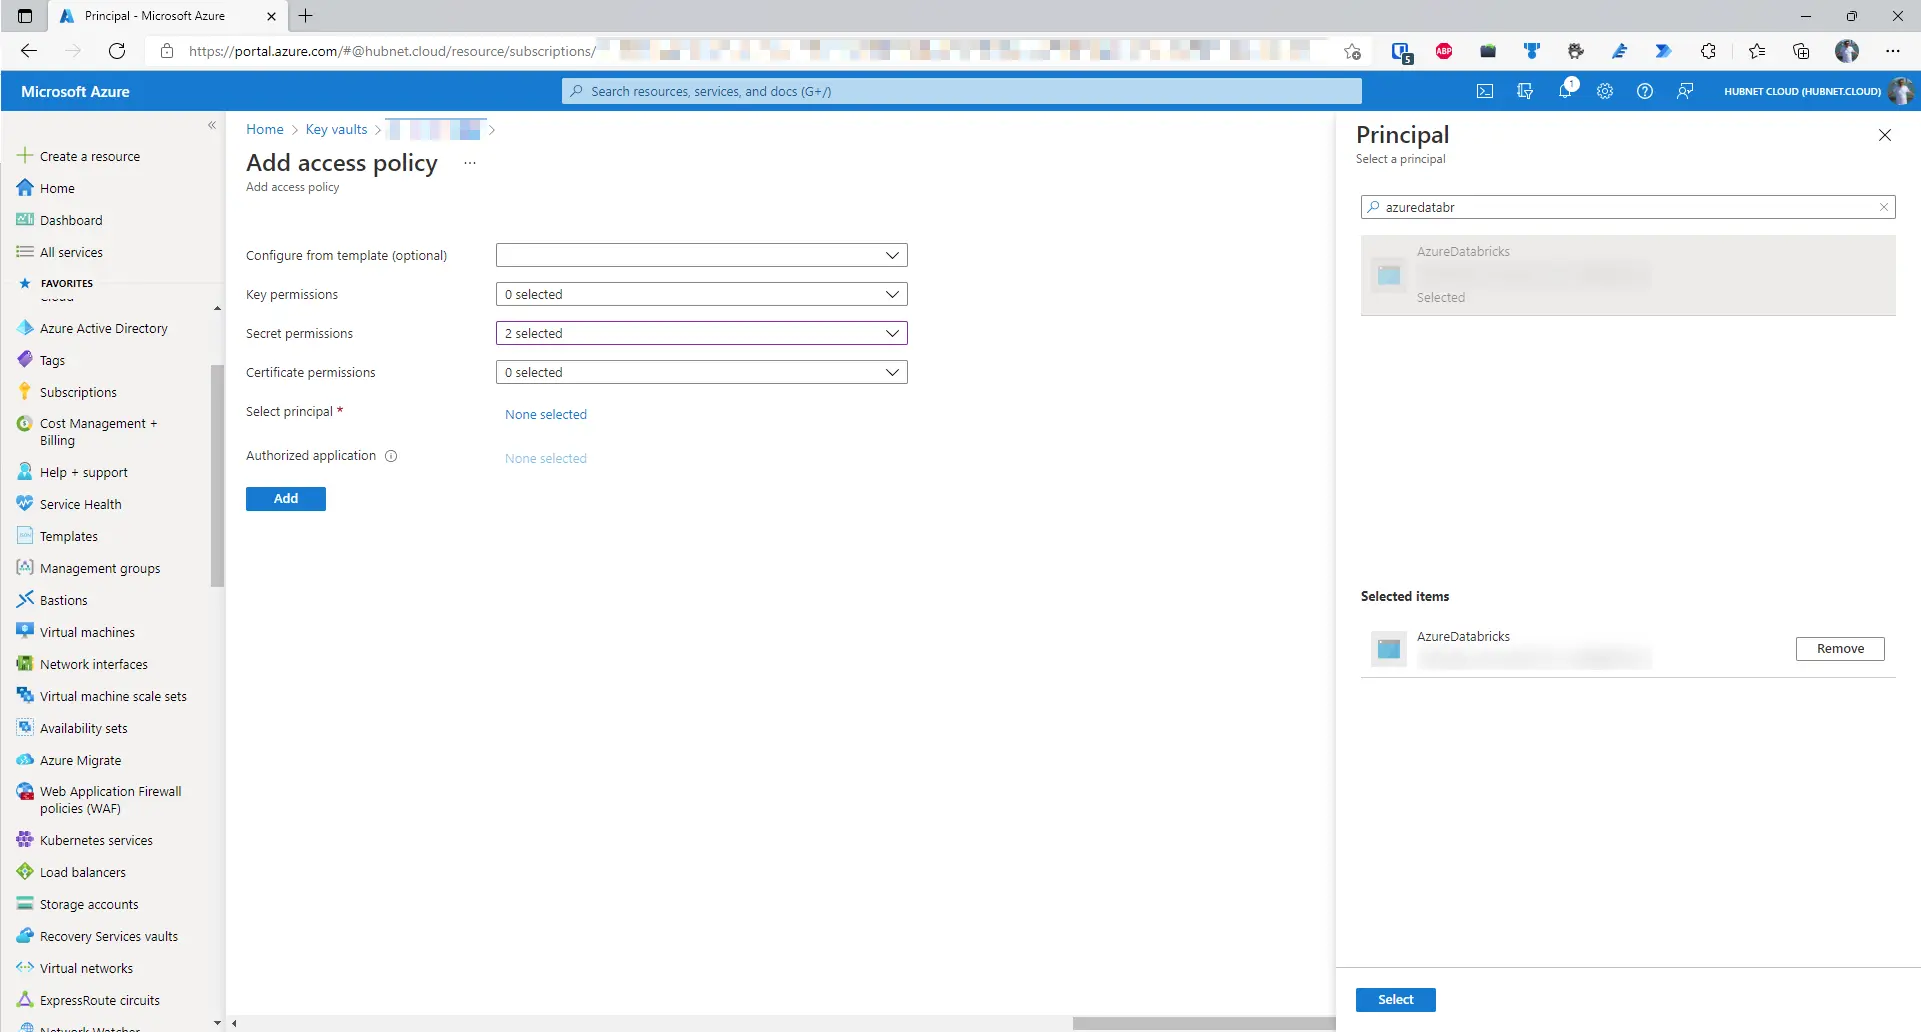 .
.Now that we have created our permissions on the Key Vault for the global AzureDatabricks enterprise application, we have to configure our workspace to connect to the key vault to get its secrets by creating a secret scope
NB - You will need at least contributor permissions on the key vault itself to carry out this operation
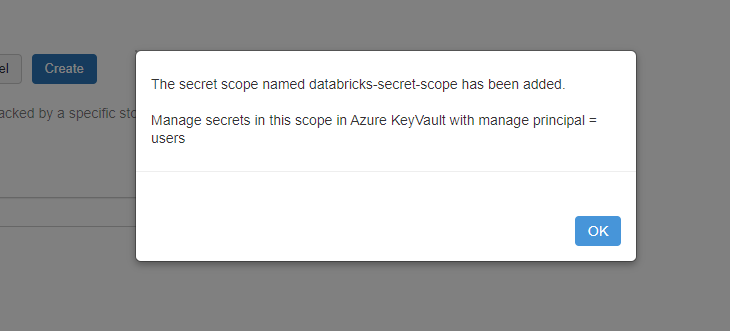
Now that the Databricks environment is configured and ready to go, we need to firstly allow Azure Data Factory to access the Databricks workspace and then integrate the notebook into our Azure Data Factory pipeline
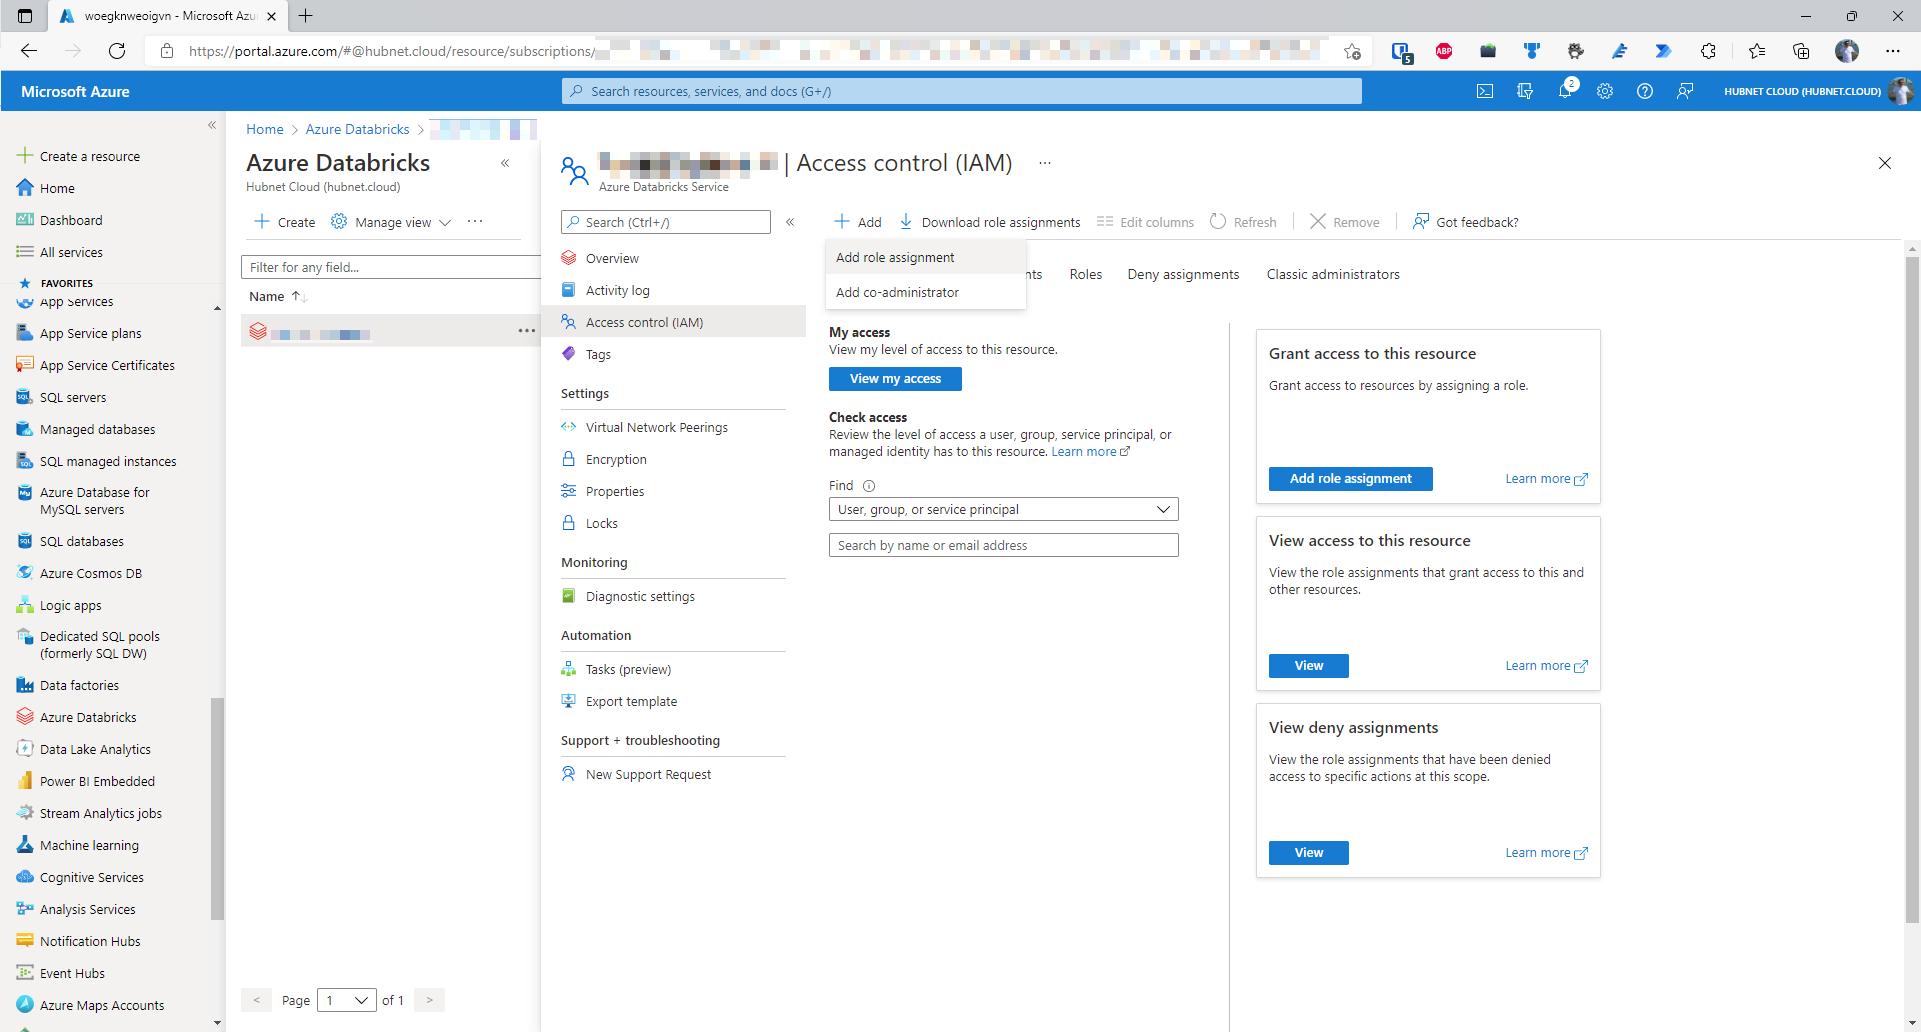
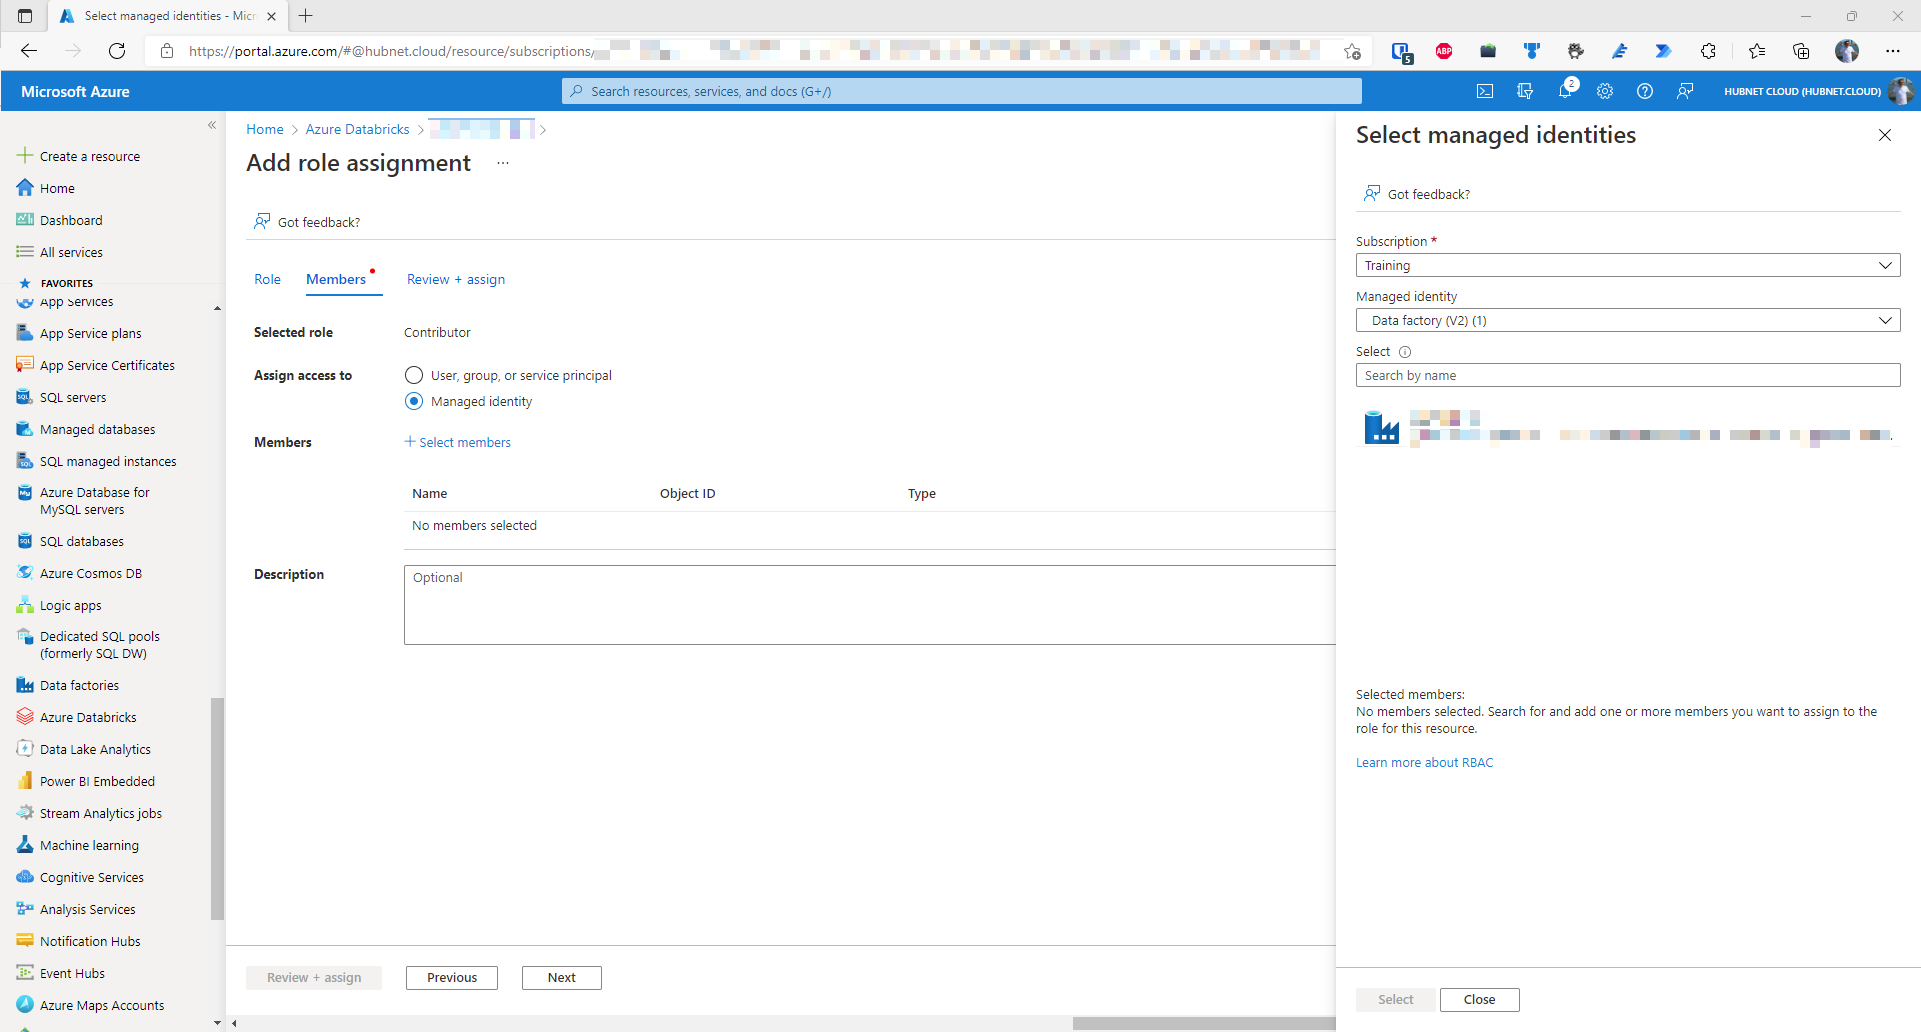
 icon
icon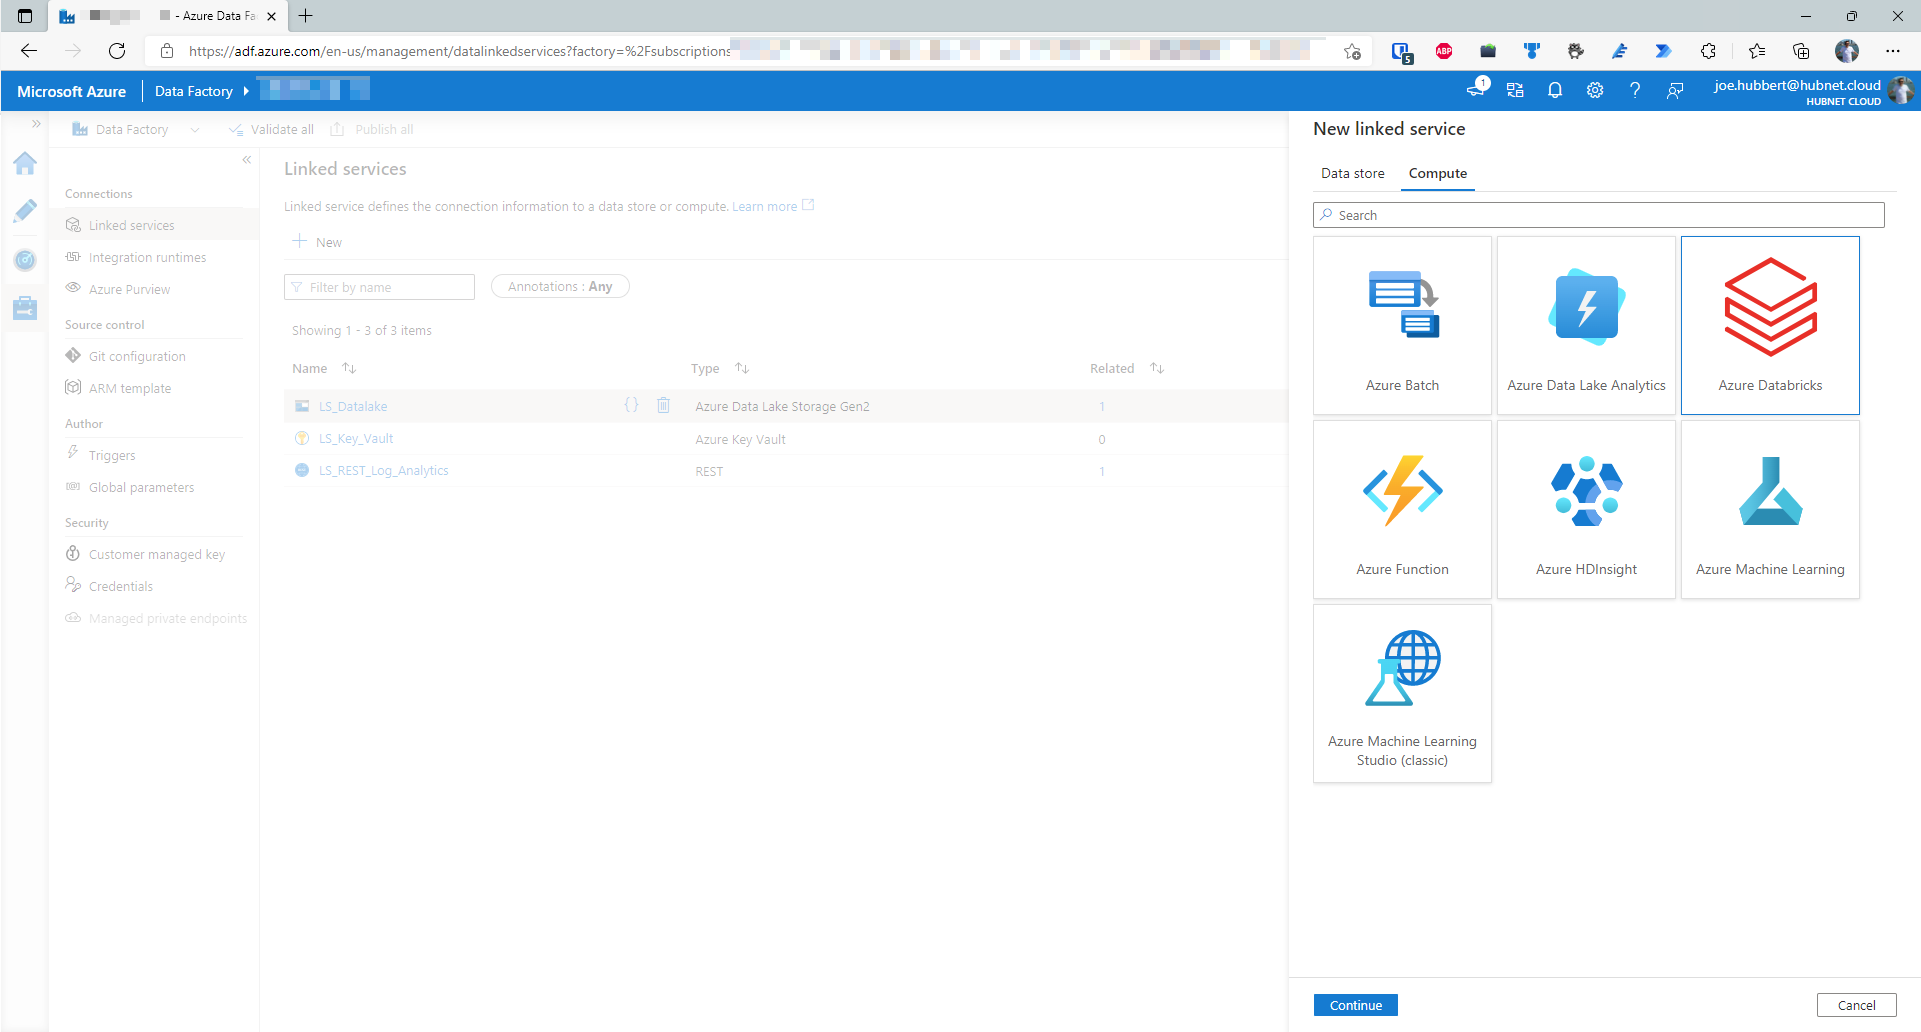
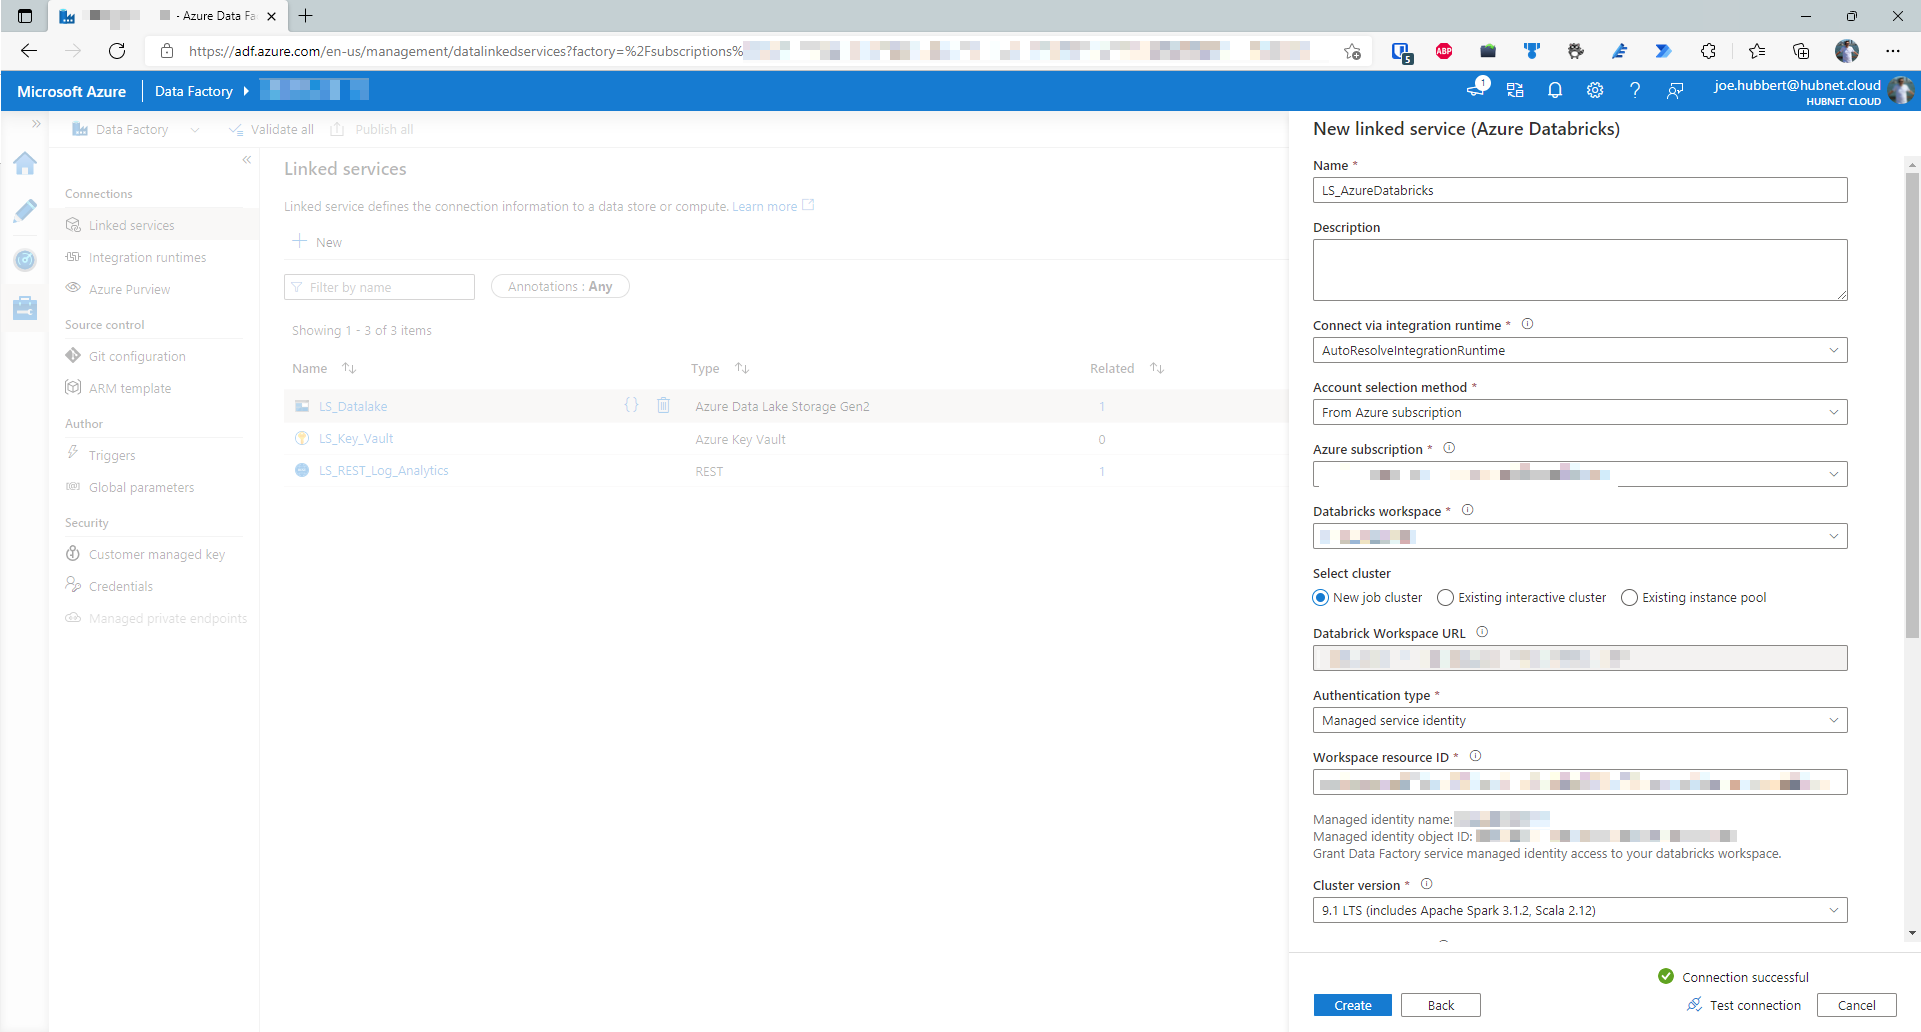
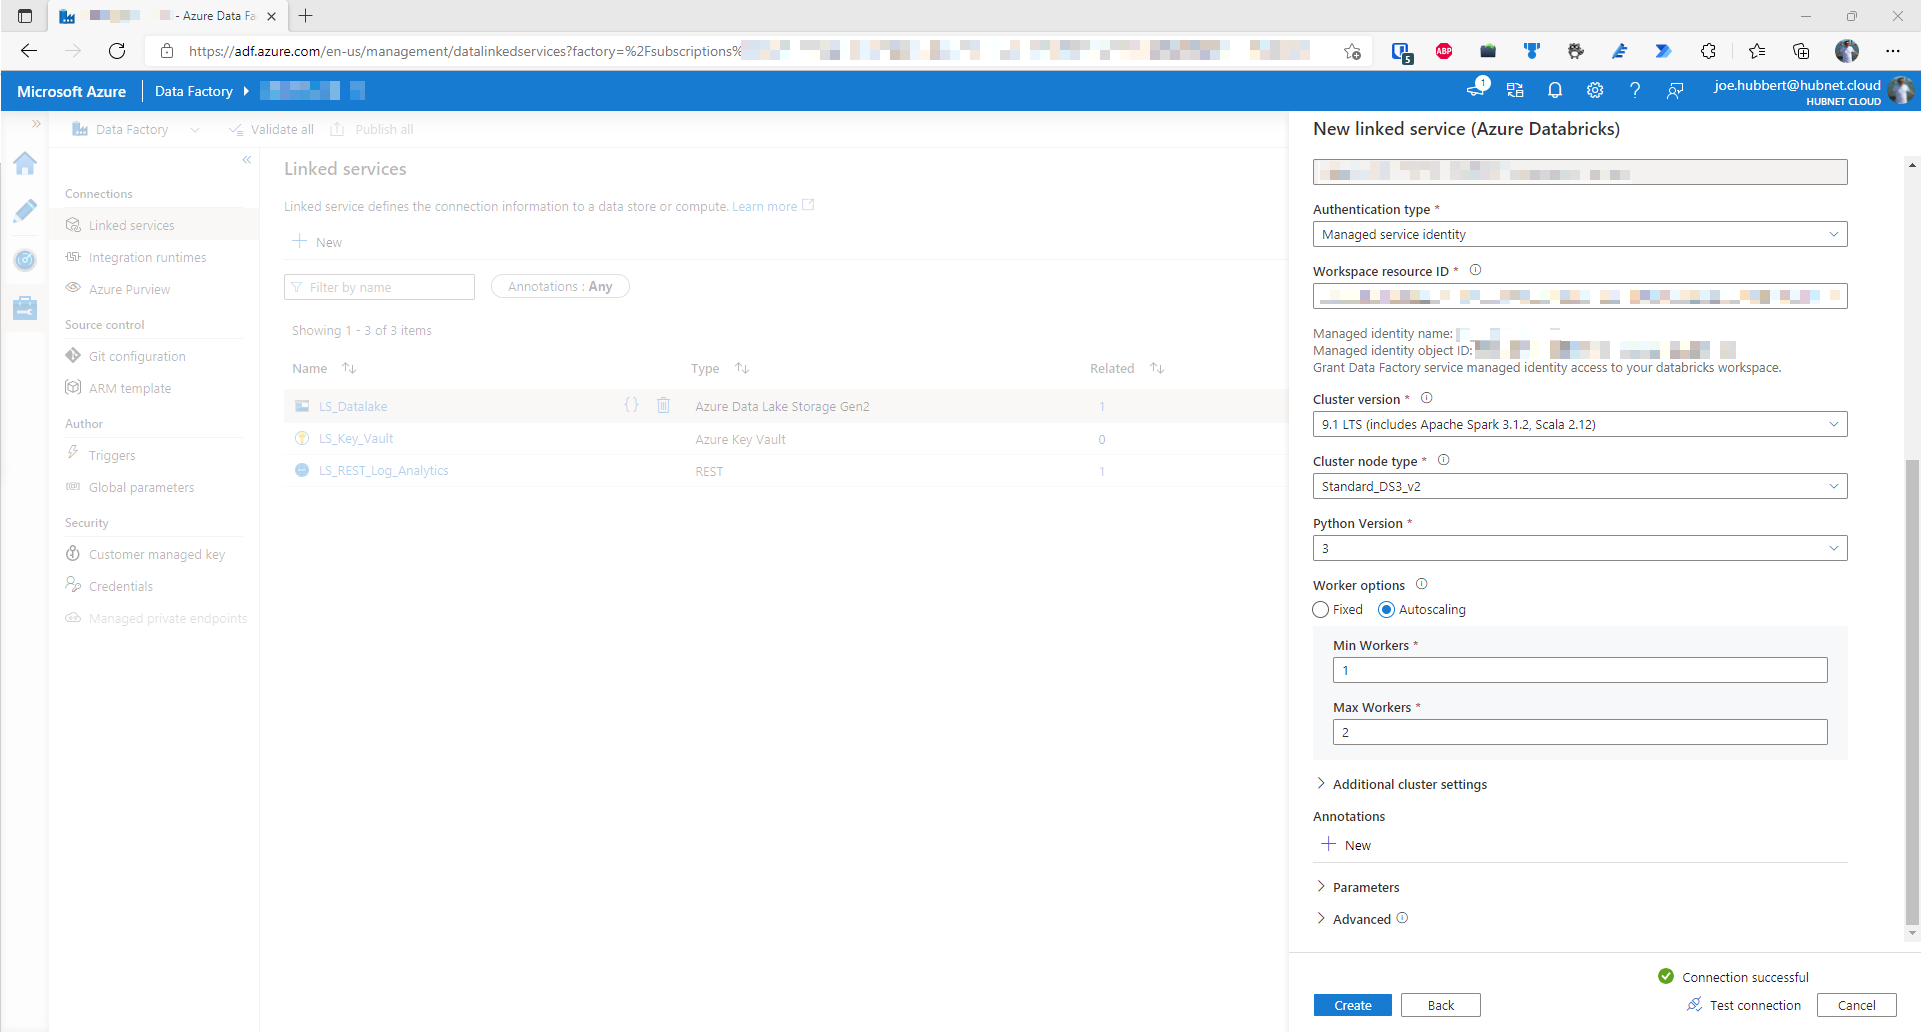

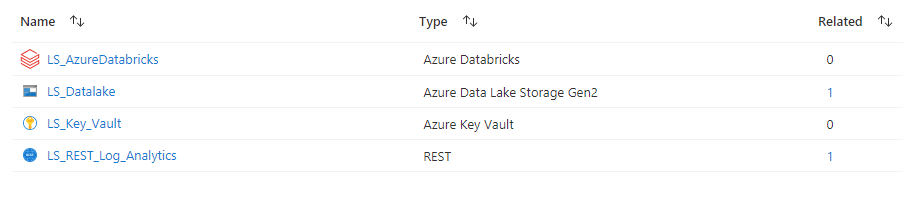
 icon
icon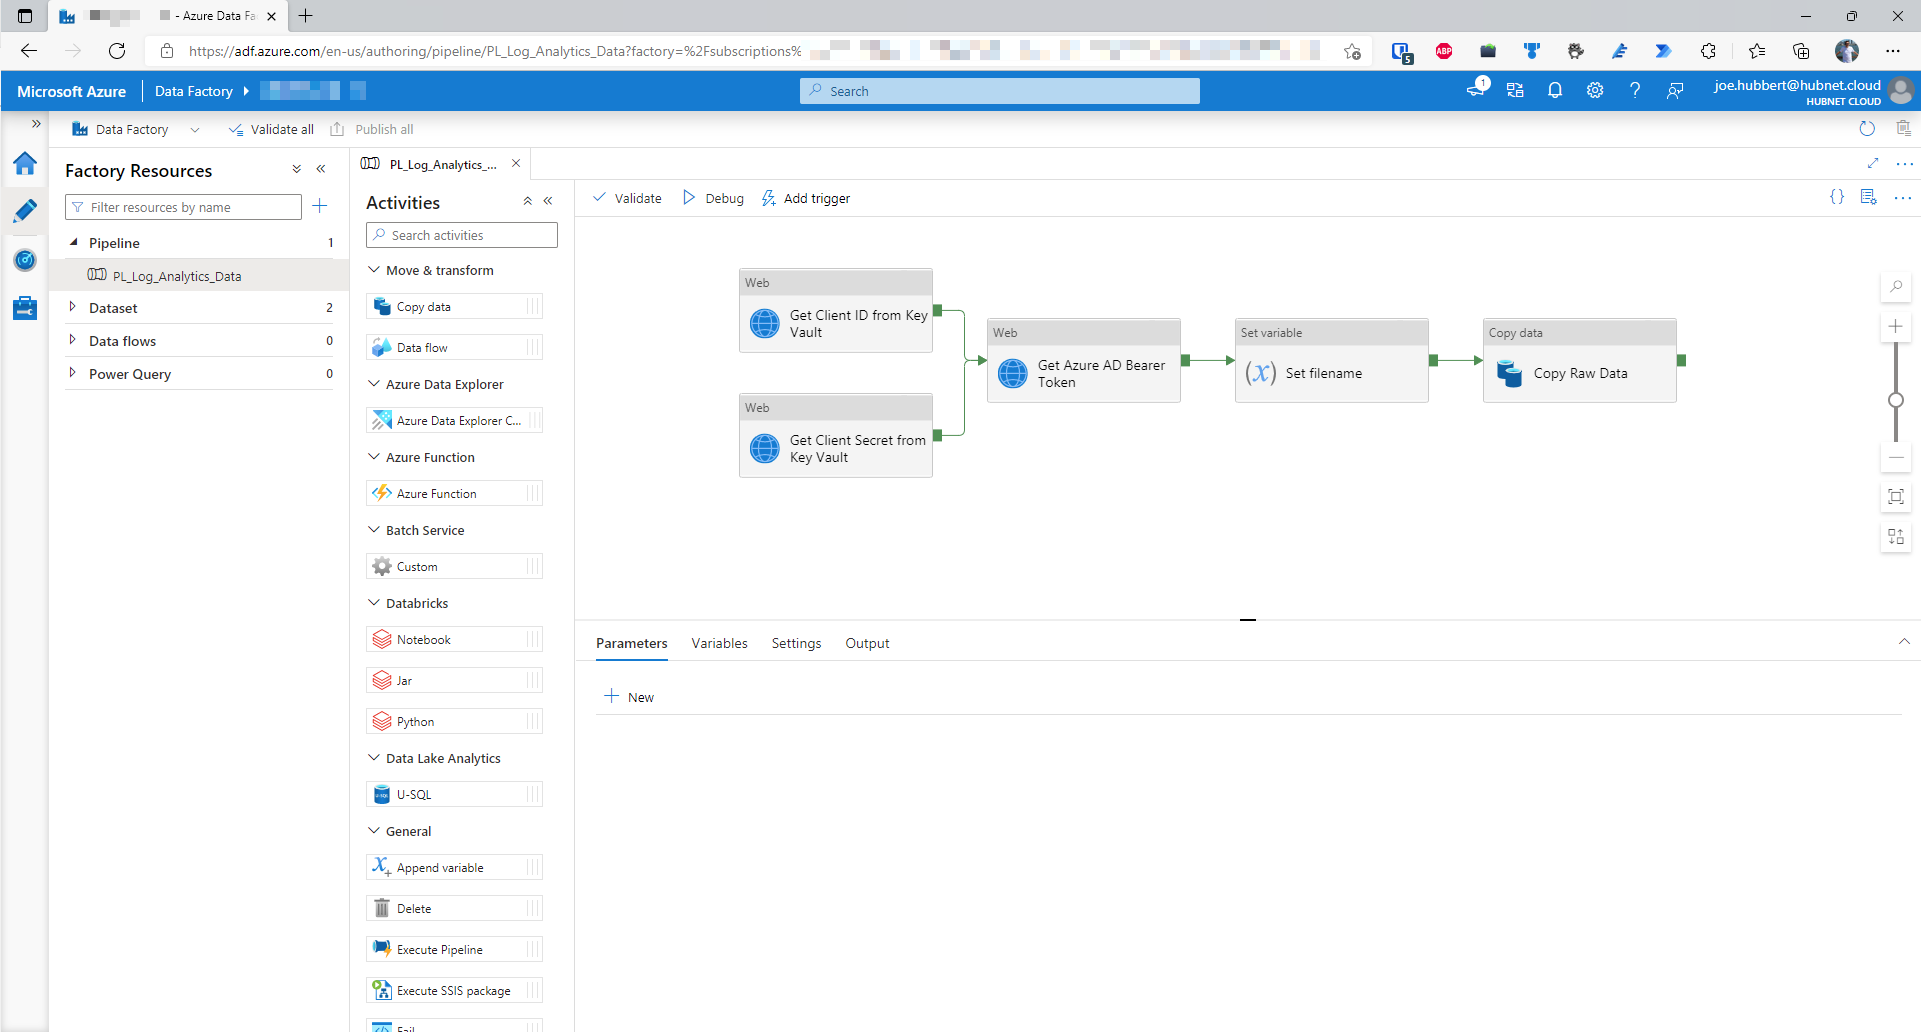
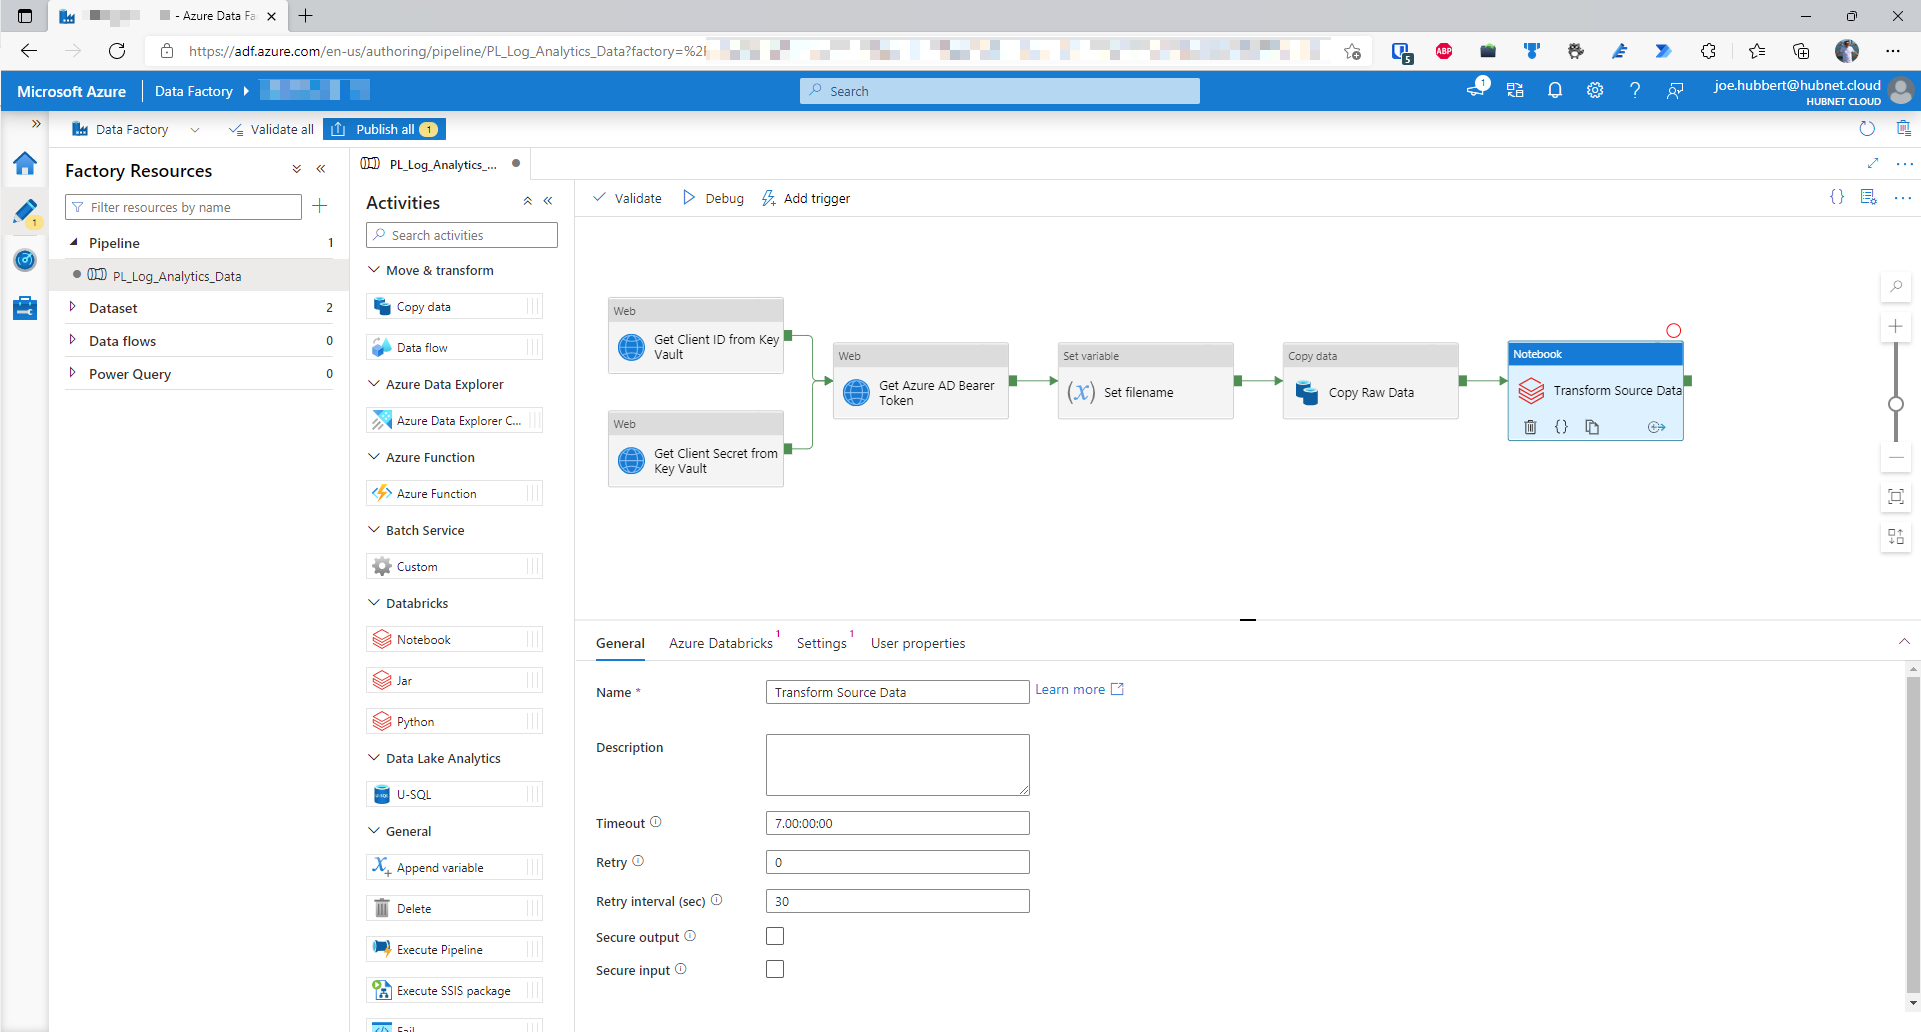
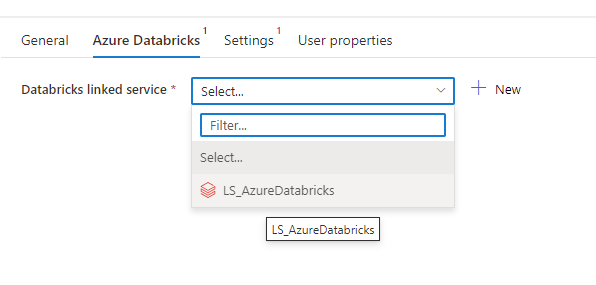
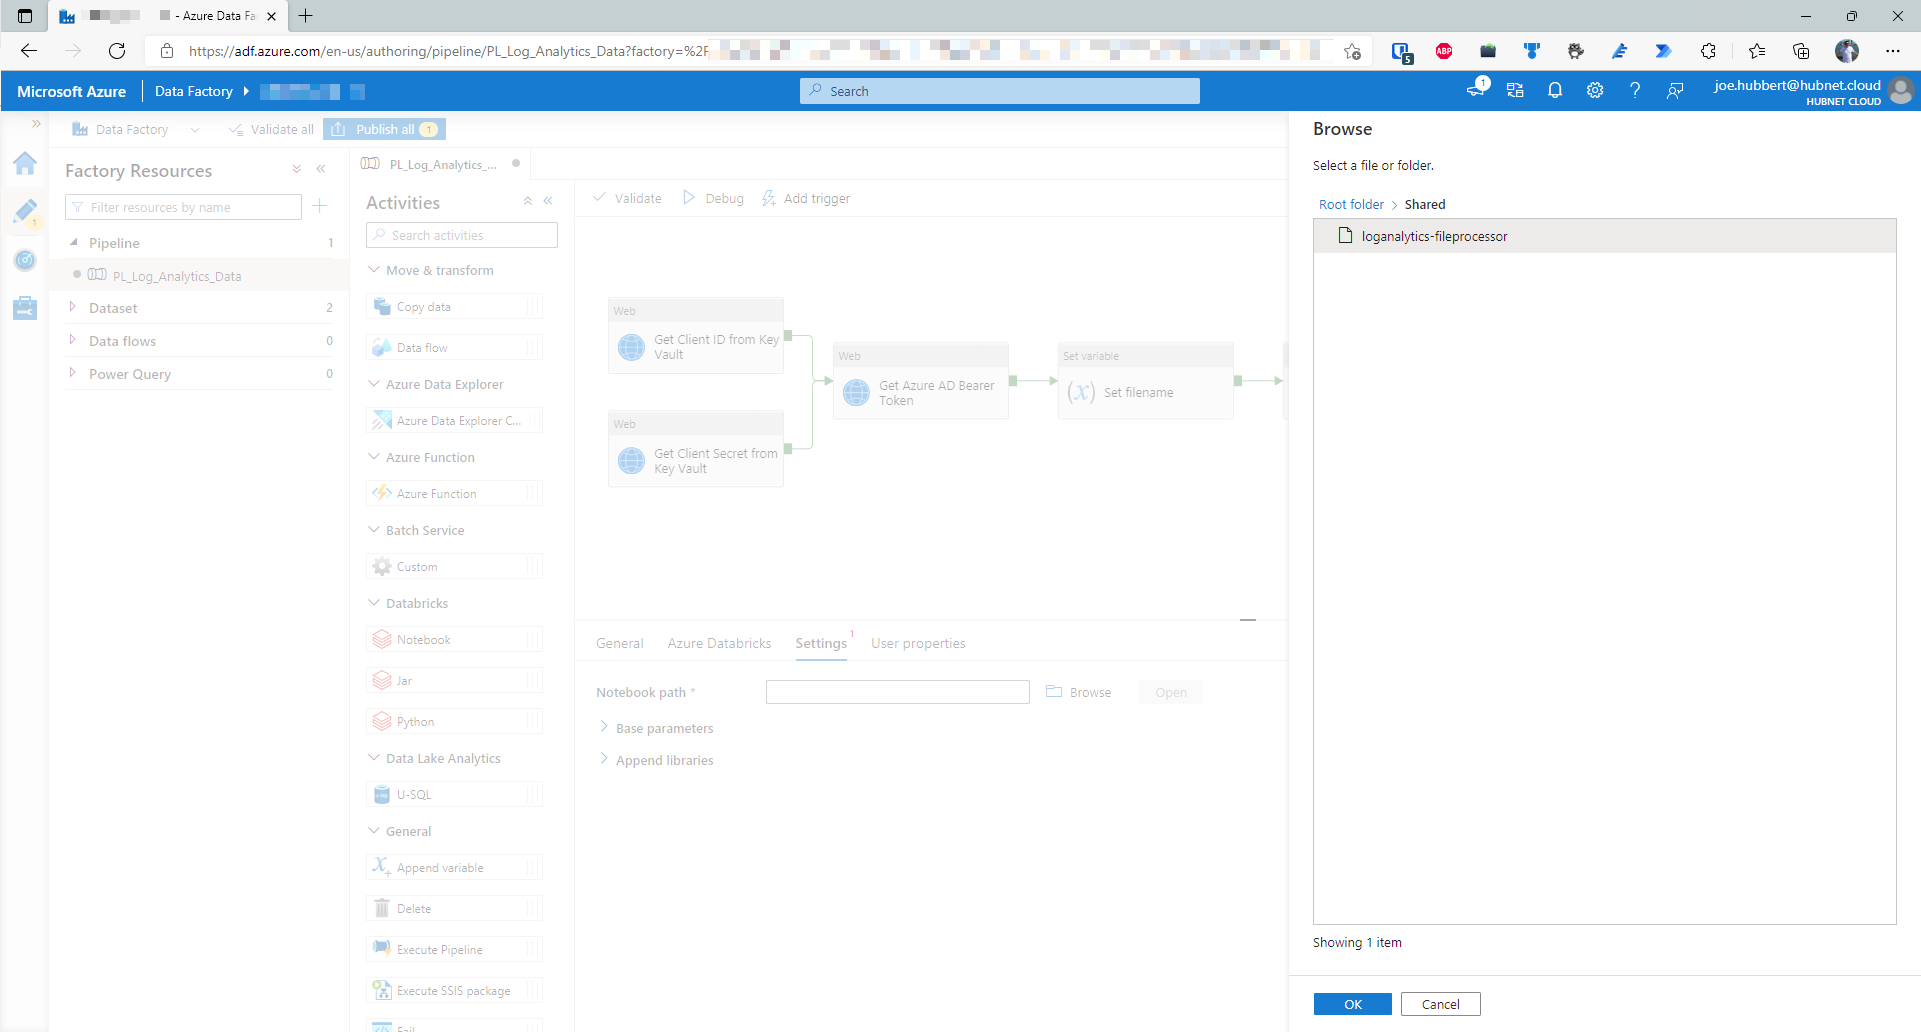
@variables('filename')
@pipeline().RunId
There we have it, we have made the Databricks notebook to process the log analytics data and have integrated this notebook into our existing Azure Data Factory pipeline.
Part 2 of Reporting on Log Analytics data series.
Part 1 of Reporting on Log Analytics data series.

Summary of Microsoft Ignite event in March 2021.
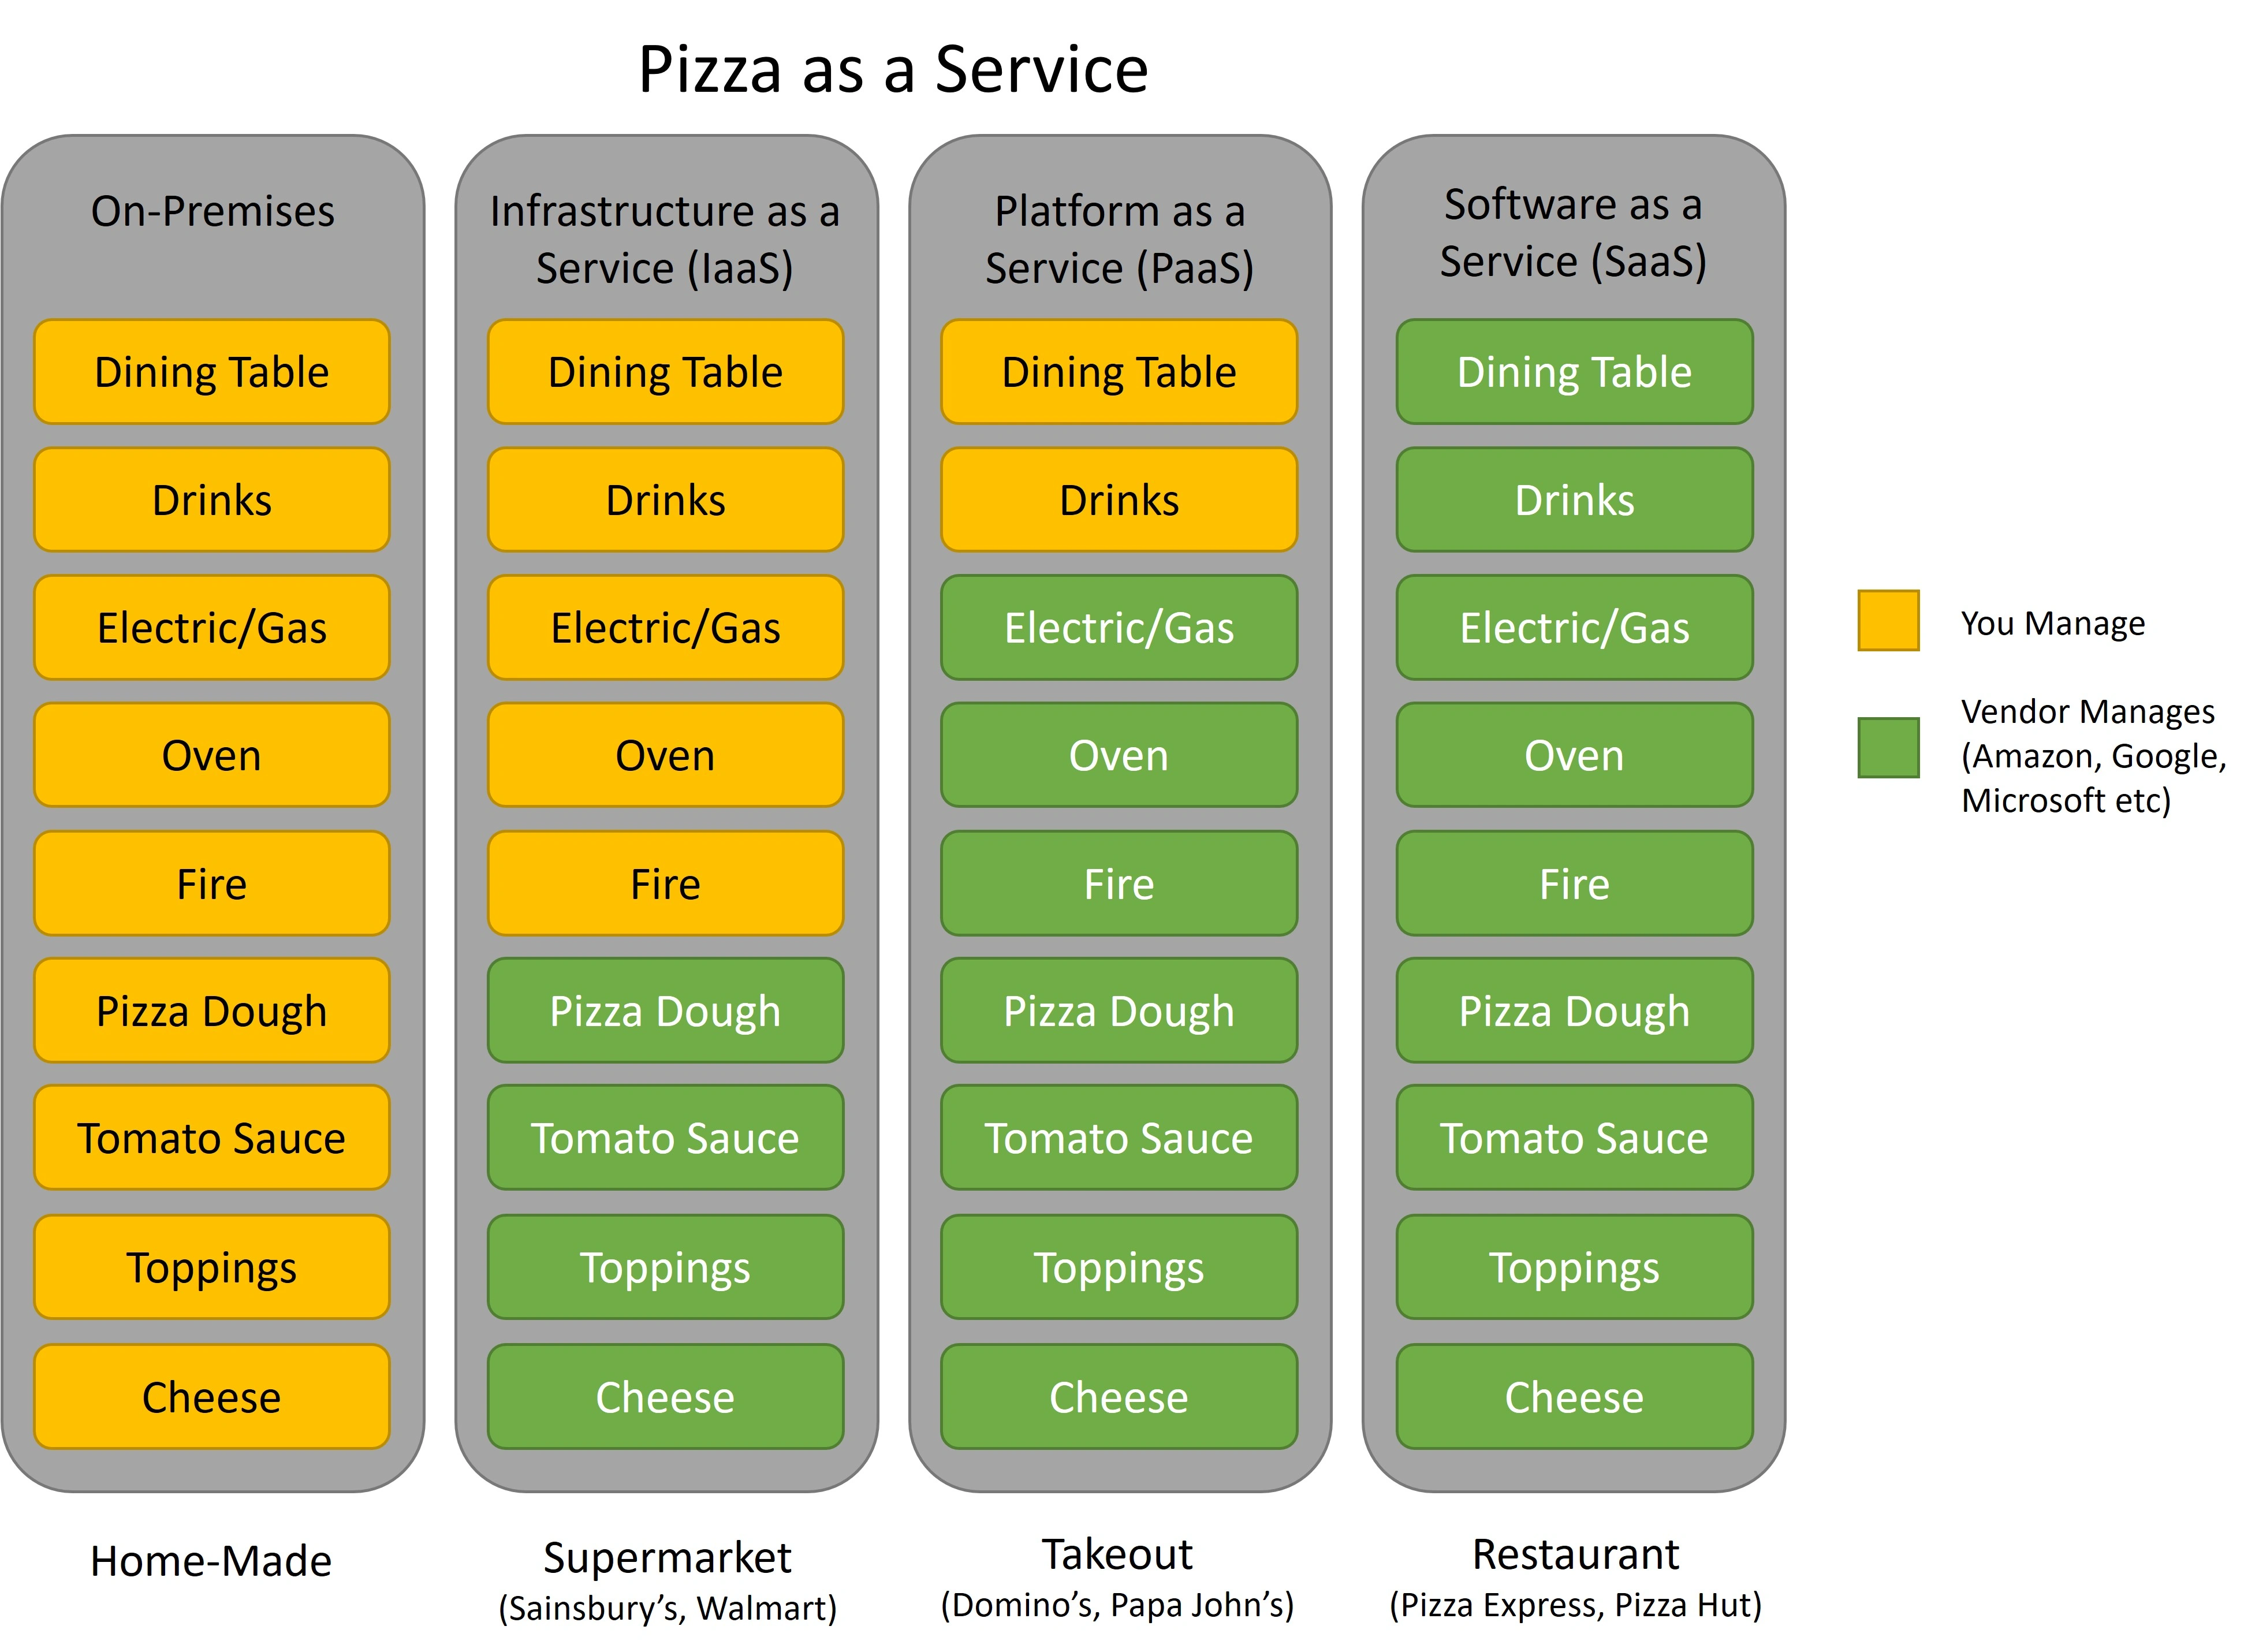
Explaination of differences between Iaas vs Paas vs Saas
Architecture example of connecting multiple sites using Azure.