Update | 23/06/2021 – Have updated dataset instructions to use parameters
Update | 02/01/2022 – Have updated the pipeline to use a variable to decide the filename for the output file
In this next post in this series, a query will be built inside Log Analytics and then the data will be extracted using Azure Data Factory
If you missed it, here is a link to Part 1
Ingesting data into newly created Log Analytics workspace
-
- If there are pre-existing Azure resources that you would like to report on already in another Log Analytics workspace then this section can be skipped
- In this scenario, the deployed Log Analytics workspace is empty
- To ingest data, navigate to go to the resource(s) that data needs to be sent to Log Analytics for. Note, this does not work with classic resources
- Under the monitoring header in the resource blade, go to the ‘Diagnostic settings’ blade
- Click on Add diagnostic setting
- In the Category details column, configure which datapoints should be sent to the Log Analytics workspace
- In the Destination details column, set the location to be the empty log analytics workspace that was just created
- Give your diagnostic setting a unique name then click Save
Create the Kusto query to extract data
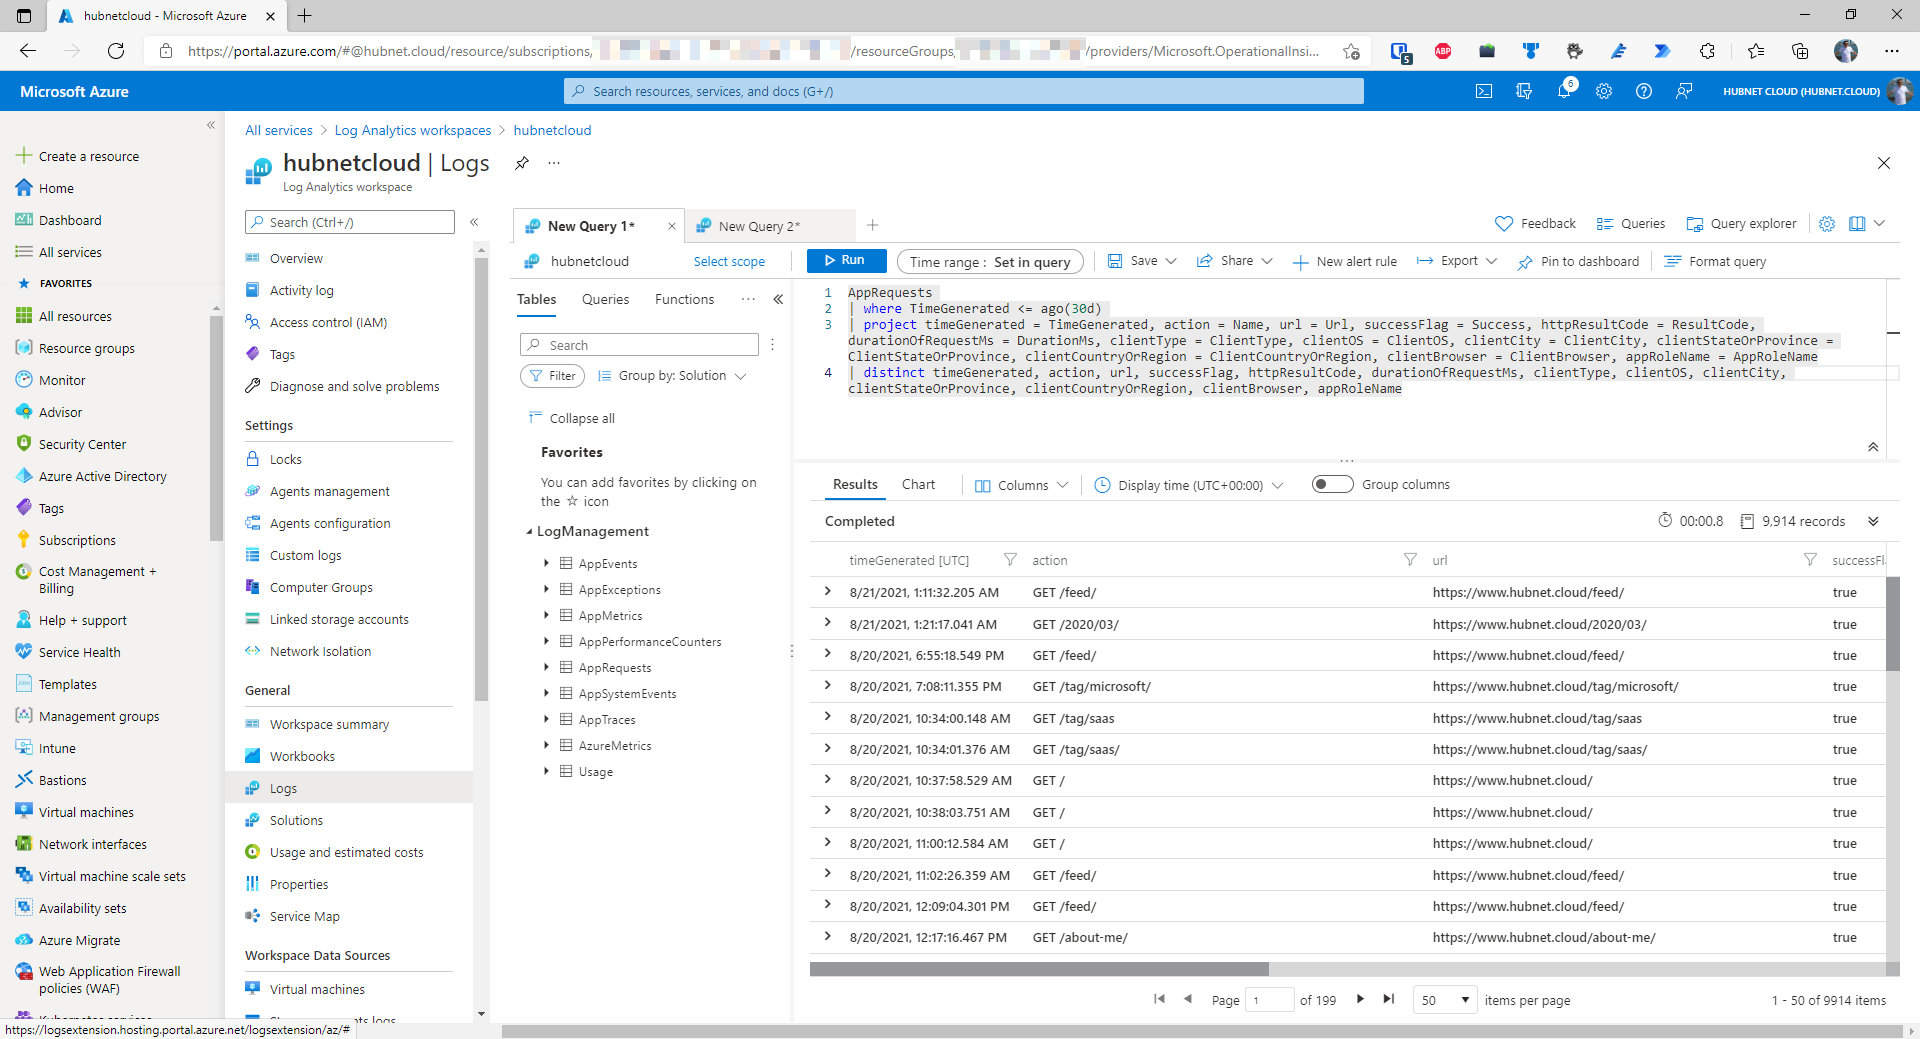
- I’ll be doing some analysis on Application Insights data so next we need to build our Kusto query like I have done in another workspace below
- Copy this query to a text file and save on your computer, this will be needed later
- To make things easier later on, we are going to save this query as a function
- Click on Save then Save as function
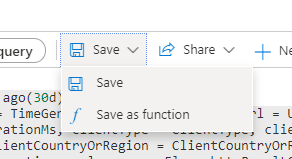
- Give your query a unique but descriptive name and ensure a category has been assigned
- Now the query/function is in place, we can progress to the next step for extracting the data in Azure Data Factory
The Azure Data Factory environment
I liken setting up Azure Data Factory to be like an onion through its multiple layers
- Layer one consists of integration runtimes which facilitate the connectivity to linked service types such as Azure Blob Storage, Snowflake, Salesforce, and Azure Cosmos DB
- Layer two consists of the linked services themselves, these can either be data connections or compute connections. The above listed linked service types would count as examples of data connections. Compute connections would be to linked service types such as Azure Functions or Azure Databricks. We can utilize compute power in our pipelines as well as apply data transformations, which is neat
- Layer three consists of datasets which are connected to the linked services we have defined in our factory. Examples of this include SQL Tables, Blob Storage Folders, REST APIs
- The final layer, layer four, consists of the pipelines. These are where the data transformations/compute activities/data flows will take place
Creating linked services
- Open the deployed Azure Data Factory and click on the toolbox icon on the left-hand pane, it has Manage as its tooltip

- If any extra Integration runtimes are required to be setup, such as a self-hosted integration runtime to allow private connectivity to Azure resources or on-premises datasets, then that can be setup in that blade
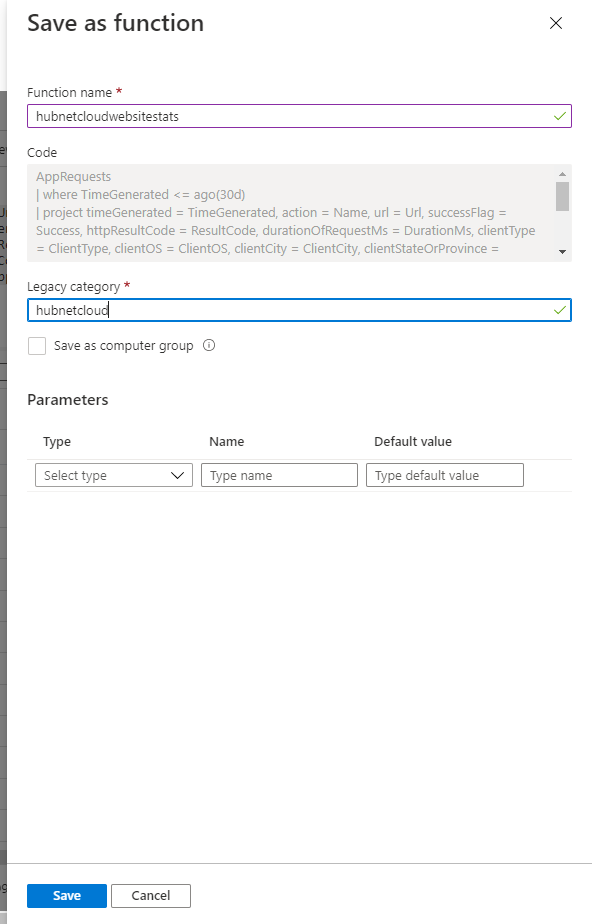
- Navigate to the Linked services blade, if not already in that location
- Create all required linked services by clicking on Create linked service
- Azure Data Lake Storage Gen 2
- Find that service in the list of available services and click Continue
- Give the linked service a prefix of LS_ in its name so it is obvious that it is a linked service and call it something like LS_Datalake
- If using a non-default integration runtime, choose that, otherwise leave as default
- Choose managed identity as the authentication method
- Choose the Azure Subscription your data lake is in
- Choose the correct storage account
- Test connection to verify connectivity
- If all is okay, then click Create
- Azure Key Vault
- Find that service in the list of available services and click Continue
- Give the linked service a prefix of LS_ in its name so it is obvious that it is a linked service and call it something like LS_Key_Vault
- Choose the Azure Subscription your key vault is in
- Choose the correct key vault
- Test connection to verify connectivity
- If all is okay, then click Create
- Log Analytics REST API
- Find the REST service in the list of available services and click Continue
- Give the linked service a prefix of LS_ in its name so it is obvious that it is a linked service and call it something like LS_REST_Log_Analytics
- If using a non-default integration runtime, choose that, otherwise leave as default
- Enter the base URL as https://api.loganalytics.io/v1/workspaces/<Insert the workspace ID of your Log Analytics Workspace>/ – This should be listed in the Azure Portal in the blade for your Log Analytics workspace
- Set the authentication type to be Anonymous
- Azure Data Lake Storage Gen 2
- Click on Publish All and Publish
Creating datasets
- Click on the pencil icon on the left-hand pane, it has Author as its tooltip

- Create all required datasets by clicking on the plus icon and select Dataset
- REST Dataset
- Find REST on the list, click on it
- Click Continue
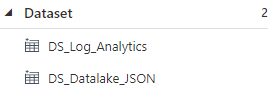
- Name the new dataset with the prefix DS_ something like DS_Log_Analytics
- Select the Linked Service to be the same as the one that was created in the last section
- Type query in the Relative URL field
- Data lake JSON Sink
- Ensure that you have provisioned a container and/or folder structure for your data to be copied to
- Find Azure Data Lake Storage Gen 2 on the list, click on it
- Click Continue
- Select JSON and click Continue – No other format is supported for the output from the REST API
- Select the Linked Service to be the same as the one that was created in the last section
- Name the new dataset with the prefix DS_ something like DS_Datalake_JSON
- Click Ok
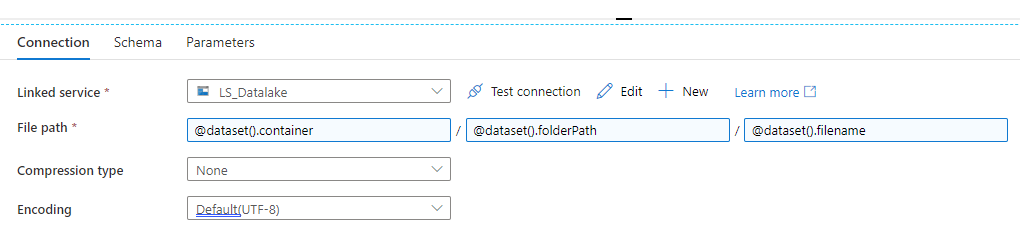
- Go to the Parameters tab – Parameters will be used so this dataset can be utilised by multiple pipelines saving yourself from use-case specific datasets in your factory. That can quickly become hard to manage!
- Click New
- Create new parameters for ‘container’, ‘filename’ and ‘folderPath’
- Go back to the Connection tab
- To specify the file path click into the Filesystem text box
- Click on the link that says Add dynamic content
- Choose ‘container’ from your parameters list (It should show in the large textbox as @dataset().container) and click Finish
- Repeat for the Directory text box, choosing the ‘folderPath’ parameter
- Repeat for the File textbox, choosing the ‘filename’ parameter
- REST Dataset
- Click on Publish All and Publish
Creating the pipeline
- Create the pipeline by clicking on the plus icon and select Pipeline
- Give the pipeline a name with the prefix PL_ something like PL_Log_Analytics_Data
- Next, we must authenticate the requests to the Log Analytics REST API using the service principal created in part 1
- This can be achieved by getting the client id and secret of the service principal from Azure Key Vault to generate a bearer token valid for a specific amount of time
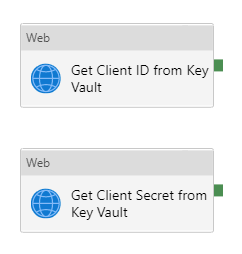
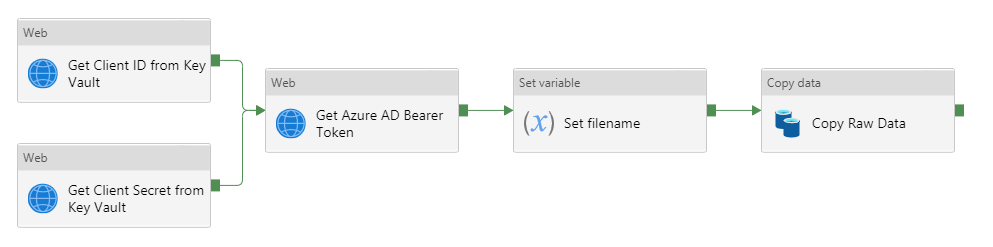
- In the Activities blade, under the General header, click on the Web activity and drag it into the workspace to the right
- Give this activity a name of Get Client ID from Key Vault
- In the General tab, check the Secure output box so no credentials are exposed in logging
- In the Settings tab, in the URL field, enter the following
- https://<vaultname>.vault.azure.net/secrets/<secretname>
- Ensure that the suffix ?api-version=7.1 is added to your URL (Correct at time of writing) – Documentation
- It should look like https://<vaultname>.vault.azure.net/secrets/<secretname>/?api-version=7.1
- Set the Method to be GET
- Expand Advanced
- Set the authentication method to be MSI
- Set the value of Resource to be https://vault.azure.net
- In the Activities blade, under the General header, click on the Web activity and drag it into the workspace
- Give this activity a name of Get Client Secret from Key Vault
- Repeat the steps shown in step 4
- Click on Publish All and Publish
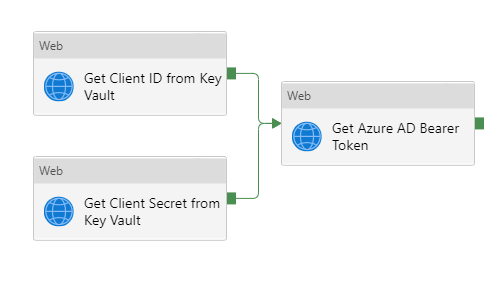
- In the Activities blade, under the General header, click on the Web activity and drag it into the workspace
- Give this activity a name of Get Azure AD Bearer Token
- In the General tab, check the Secure output checkbox so no credentials are exposed in logging
- Do the same for the Secure input checkbox
- In the Settings tab, in the URL field, enter the following
- https://login.microsoftonline.com/<Azure AD Tenant ID>/oauth2/token
- The tenant id can be obtained from the Azure Active Directory blade in the Azure Portal
- Set the Method to be POST
- Add a new Header
- Name: Content-Type
- Value: application/x-www-form-urlencoded
- For the Body, click on the textbox and click Add Dynamic Content
- Enter the below and click Finish
-
@concat('grant_type=client_credentials &client_id=',activity('Get Client ID from Key Vault').output.value,'&resource=https://api.loganalytics.io/&client_secret=',activity('Get Client Secret from Key Vault').output.value)
-
- For both of the previous key vault activities, click on the green box and drag it onto the Get Azure AD Bearer Token activity
- Click on Publish All and Publish
- Now all authentication is in place, we can finally copy data from Log Analytics
- First we need to declare a pipeline variable in the Variables tab in the bottom pane of the pipeline authoring view
- Click + New
- Call the newly created variable filename and ensure it is if of type string with no default value
- In the Activities blade, under the General header, click on the Set variable activity and drag it into the workspace
- Give this activity a name of Set filename
- In the Variables tab set the name to be filename variable that was just created
- Click on the value field and click on Add Dynamic Content and insert the below
@concat('appLogs',utcnow('yyyy_MM_dd_HH_mm_ss'),'.json') - Click on the green box on the Get Azure AD Bearer Token activity and drag this to the Set filename activity
- In the Activities blade, under the Move & transform header, click on the Copy data activity and drag it into the workspace
- Give this activity a name of Copy Raw Data
- In the General tab, check the Secure input checkbox so no credentials are exposed in logging
- In the Source tab, select the DS_Log_Analytics dataset previously created for the Source dataset
- Set the Request Method to be POST
- For the Request Body, set to take the format of below
-
{ "query": "" } - In between the “”, paste the name of the Kusto function that was saved earlier. Ensure that any “ are replaced with ‘ in the query as Data Factory does not play nicely with “ that are part of request bodies. In addition, the query will need to be condensed onto one line. This can be achieved using a tool such as Visual Studio Code.
- It is also possible to save your log analytics query as a workspace function within your Log Analytics workspace and then you just call that function as the query. This is considered best practice as it allows you to manage your queries centrally and use escape characters such as “within your query.
- Add the content type Additional Header
- Name: Content-Type
- Value: application/json
- Add the authorization Additional Header
- Name: Authorization
- Value: Click on the field and click on Add Dynamic Content and insert the below
-
@concat('Bearer ',activity('Get Azure AD Bearer Token').output.access_token)
- In the Sink tab, select the DS_Datalake_JSON dataset previously created for the Sink dataset
- Set the following values for each parameter
- filename: click on Add Dynamic Content and set to be the following
@variables('filename') - container: loganalytics
- folderPath: raw-data
- filename: click on Add Dynamic Content and set to be the following
- Set the Copy behavior to Flatten Hierarchy
- Set the File pattern to Set of Objects
- Click on the green box on the Set filename activity and drag this to the Copy Raw Data activity
- Click on Publish All and Publish
- Click on Debug to test the pipeline
- Assuming that all is well, there should be green ticks. If not, find the Output of the activity that failed which should give some indication of the cause
- The main issue I had when coming across this problem for the first time was that in the copy data task, the request method was set to GET instead of POST
- The main issue I had when coming across this problem for the first time was that in the copy data task, the request method was set to GET instead of POST
- The output json should show in the Data Lake container
- If the file is downloaded you will notice that it is in a horrible format, all condensed into one line
- This will be fixed in the next post, where Databricks will unpick the file and convert into a tabular format
Conclusion
In part two, the following activities have been completed:
-
-
- Created Log Analytics Kusto Query
- Created Data Factory resources
- Linked Services
- Datasets
- Pipelines
-
- Copied data from Log Analytics to Azure Data Lake Storage Gen 2
Up next, part 3 where we unroll the data using Azure Databricks into a semi-recognizable and reportable format